
Main Editor Menu
 |
|
 |
|
 |
|
 |
|
 |
|
 |
Welcome How Game Editor Works Interface Main Menu Actor Control Events Actions
The
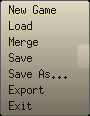
Main Editor Menu Bar
File
![]()
New Game: Clear the current game and begin designing a new game.
Load: Clear the current game and load a previously saved game.
Merge: Merge the current game with a newly loaded game. (If the loaded game has an Actor with the same name as an Actor in the currently loaded game, the results will be unpredictable.)
Save: Save the changes you've made to the current file.
Save As: Save the current game with a different location or filename.
When saving a game, all animations, fonts, and sounds are moved into a folder that is automatically created named "data". This folder is located in the game directory.
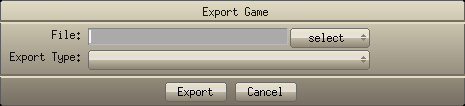
Export: Create the final executable game and pack the data.
Game Editor exports a game as a single executable file or a single data file (iPhone/iPad).
This file includes all of the game's data (animations, sounds, ...).
Available Export Types are:
Windows Executable: Windows executable file (Compatible with ).
Windows version supports:
- Windows 95, 98, Me, NT, 2000, 2003, XP, Vista, 7Minimum System Requirements:
- Windows 95
- 32MB RAM
- x86 compatible processor (Pentium, AMD, ...)
- 200MHz
Pocket PC / Handheld PC Executable: Executable file compatible with Pocket PC, Handheld PC, Windows Mobile (2003, 2005, 6, 6.5).
Windows Mobile-based Smartphone Executable: Smartphone executable file.
Pocket PC, Handheld PC and Smartphone version supports:
- Windows Mobile (2003, 2005, 6, 6.5)
- ARM processors (ARM, StrongARM, XScale, OMAP, PXA, ...)
- Full screen mode only
- Ogg Vorbis, wav, mod, s3m, it and xm music filesMinimum System Requirements:
- Pocket PC 2002
- Less than 10MB RAM (need to test the game)
- ARM processors (ARM, StrongARM, XScale, OMAP, PXA, ...)
- 200MHzA MMC/SD expansion card is recommended
Linux Executable: Linux executable file
GP2X Executable: GP2X executable file.
GP2X version supports:
- Firmware 2.0.0 and later
- Full screen mode only
- Ogg Vorbis, wav, mod, s3m, it and xm music filesGame Data Only (iPhone, iPad or game level without the executable engine): Exports only the data file without game engine. This format is used if your game has been distributed in numerous game files or for make games for iPhone and iPad.
In order to create games for iPhone or iPad, first you need to export the game (or the game levels) as "Game Data Only".
The first level must have the same name of the Product Name (your game name).
For example, if the product name is "TheGame", the first level file must be "TheGame.dat".
After get the exported .dat files, add the files in the xcode project (as a new resource), update the custom info you want (game icon, your name, game name, ...) and build the project.Game Data Only for Pocket PC, Handheld PC, Smartphone or GP2X: Exports only the data file with optimizations for Pocket PC, Handheld PC, Smartphones and GP2X devices.
Custom extensions:
If you don't want to use the .dat extension, just rename to anything you want.
File Association:
If you distribute several games, you can save space by exporting only one with the executable engine.
Rename the .dat files to .gedx extension and use a installation tool to associate the .gedx extension with the location of engine.
So, the other games will be executed by the system when the user click in .gedx files.
Exit: Close the Game Editor program and exit to the system.
Add Actor
![]()
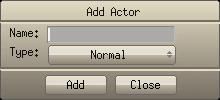
In the Game Editor universe, all game objects are referred to as Actors (is it a background, rocket, ship...).
Actors populate the game and can be given behavior scripts using Game Editor Events and Actions.Adding Actors to the game
For a step by step walk through of how to create a Normal Actor see the Tutorials section.
Name: Use this box to name an Actor. Actor names must begin with characters and must be followed with characters, numbers, or '_'. Script functions and variable ("vars") names are not allowed.
Allowed: MyActor, ball, dog_catcher
Not Allowed: /right, CreateActor, fgets
Type: Choose the type of new Actor to be created from the drop down box: Normal, Canvas, Wire Frame Region or Filled Region.Normal: An Actor that can receive animations (image files that are associated with the Actor). This Actor can be used to create the widest variety of behaviors in a program.
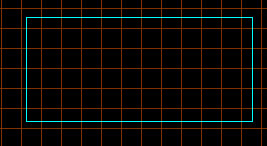
Canvas: Think of yourself as a budding Picasso when you use the Canvas Actor. Draw on this Actor using the Drawing Functions.This Actor allows for the drawing of lines, circles, etc.
A Canvas Actor is depicted within the Game Editor as a cyan rectangle.The Canvas Actor can be moved or resized freely. The rectangle is invisible when the game is running in game mode. For a step by step walk through of how to create a Canvas Actor see the Tutorials section.
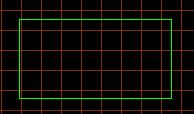
Wire Frame Region: The Wire Frame Actor is used as a sensor to carry out Actions like "Open the door" when , for example, a Normal Actor enters the Wire Frame Region. It can also be used to create a barrier that repels game objects like balls. As an example, in a pinball game, the ball might bounce off of a wire frame barrier. The Wire Frame Region doesn't register mouse clicks.
A Wire Frame Region Actor is shown within the Game Editor stage as a green rectangle. It can be moved or resized freely. The rectangle is invisible when the game is running in game mode.
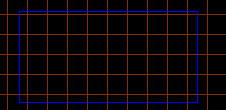
Filled Region: Unlike the Wire Frame Region, the Filled Region Actor registers mouse clicks, like normal actors. This allows for the creation of hotspots or sensors that respond to mouse clicks without use normal actors.
A Filled Region Actor is shown within the Game Editor stage as a blue rectangle. It can be moved or resized freely. The rectangle is invisible when the game is running in game mode.
![]()
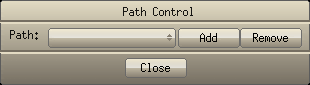
Add a new path, or select a existing path to view and edit.
Add Path:
- Enter the path name and the path duration in frames.
- Click on the "Draw" button to begin drawing the path.
- Click on the "Close" button when the new path is finished.
Right click in path point:
- Linear: Set the current node to linear.
- Curved: Set the current node to curved.
- Delete: Delete the current node.Note: Dragging the first path point with the mouse will move the entire path.

![]()
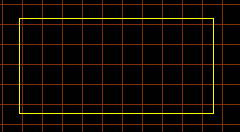
Add Activation Region:Activation Regions are screen areas that are defined by a bounding box and include game Actors.
A Region, and your actors, is loaded only when the View Actor intersects it.
The Region and all actors within the Region are destroyed when the View Actor no longer intersects it.Activation Regions allow your game to have many levels, each level in a game can be defined in a different Activation Region.
The entire game, along with all of its levels, is saved in an single game file.
Activation Regions make envisioning an entire game easy.An Activation Region is shown within the Game Editor as a yellow rectangle. It can be moved or resized freely. The rectangle is invisible when the game is running in game mode.
Right click on the Activation Region's bounding box edge to initiate a pop-up selector that will allow the removal of the Activation Region from the game..
If an Actor moves outside of the Activation Region, it will be destroyed only when the Activation Region no longer intersects with the "View" Actor.
An Actor will be destroyed by the Activation Region when it and your ascendants are outside of the "View".
Numerous Activation Regions with overlapped regions can be defined.
All of an Activation Region's Actors load inside of the defined region. The Actor's parents, and Actor reference through script is also be loaded.
Actors created with "Create Actor" will be assigned to a visible Activation Region.
If the "View" Actor leaves a region and later it comes back, all Actors will be reloaded, except those destroyed explicitly with the "Destroy Actor" Action.
Any Actor can be loaded with "Create Actor", even if has been destroyed explicitly.
If no Activation Regions have been defined, all game Actors will be loaded when the game starts.
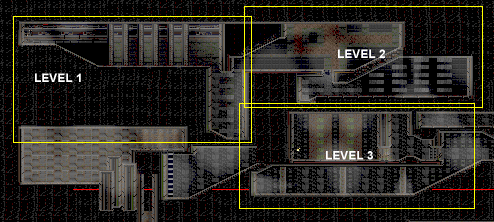
Below, a multilevel game with 3 Activation Regions:
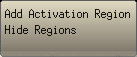
Show/Hide Regions:Show or hide Activation Regions and Region Actors
![]()
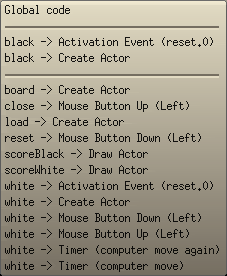
This menu give quick access to Global code and all actor's scripts (The last five used scripts will be shown first).
Use the Global Code option to freely add any 'C' code (arrays, structs and functions).'C' Language Programmers will appreciate being able to harness the full power of 'C' directly from the Script Menu.
More about script here.
![]()
Switch the Game Editor to game mode to run/test a game.
Hitting the <ESC> key exits from the "Game Mode" and returns you to the Editor.
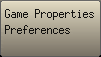
Game Properties:
- Game resolution: Select the machine detected resolution or enter a custom resolution. On Pocket PC you can change the screen orientation.
- Safe margin: This margin increases the view region used in Out of Vision event.
- Mode: Specify "Window" or "Full Screen" mode.
- Frame rate: Specify animation velocity (speed).
- Show mouse: Specify whether the mouse cursor should be shown.
- Suspend game if lost focus: Set "Yes" to pause the game when the window focus is lost on the desktop or to receive system messages on Pocket PC, Handheld PC and Smartphones.
On the Pocket PC and Smartphone it will show a game screen shot and a menu to continue or exit the game.
On smartphones this option is always active to receive phone calls.
- Use ESC key to exit game: Select "Yes" to exit game when use press the ESC key.
If you don't want use ESC key to exit, select "No" and use the ExitGame() function in any action in your game to exit.
This option will works only in your exported game.
- Motion Compensation: Select "Yes" to correct actor velocity if real framerate is slow than game framerate.
- Audio format: Set audio frequency, mono or stereo and maximum simultaneous sounds in game.
- Icon file: Specify the icon file to be used when exporting a game. To show the icon in Windows or Pocket PC files, specify an .ico icon file.
- Game title: Specify the game title to be used when exporting a game.
- Game background color: Specify the game background color
- Pocket PC and GP2X Keys: Use to remap Pocket PC or GP2X keys to the desktop keys used in a game. The key position can be different on different machines.
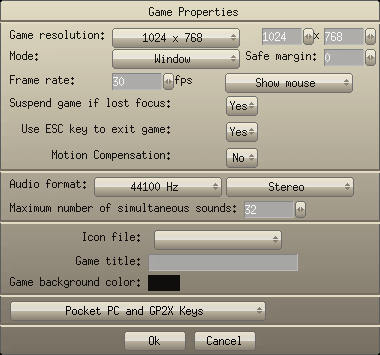
- Show Grid: Show or hide the grid.
- Grid Snap: Set grid snap to mode.
- Main color: Set the grid line color.
- Resolution: Set the color that symbolizes the game resolution perimeters.
- Grid Size: Set the grid size.
- Enable tool tips: "Yes" to turn on the tool tips. "No" to turn off the tool tips.
- Persistent undo: If you select "Yes" Game Editor will search for the corresponding .undo file and recover your game history in next game load.
- Maximum undo levels: Number of undo levels to record. This setting will take place only if the "Persistent undo" box is set to "Yes". Reduce the "Maximum undo levels" setting to decrease the size of the undo file.
- Image Editor: Select an image editor to edit your animation frames. The image editor need to handle transparent PNG image files. If you don't have an image editor, use a search engine and put the query "Image Editors with PNG Support" to find a good image editor.
![]()
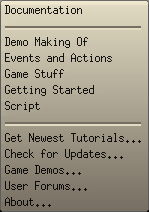
Documentation:
Go to Game Editor's documentation files.Tutorials:
Choose a tutorial topic to see an animated movie of one or more aspects of Game Editor's Game Design features.Get New Tutorials:
Select this option to get the newest multimedia tutorials. You must have and active internet connection.Check for Updates:
Select this option to get the newest latest updates to Game Editor.Game Demos:
Download game demos from numerous example files that have been created by the Game Editor user community and by Game Editor programmers.User Forums:
Go to the Game Editor forum and learn more about Game Editor.About:
About Game Editor's development and the programmers behind Game Editor.
![]()
-Mouse coordinates are relative to the game center.
-Show an Actor's coordinates relative to its Parent by clicking on the Actor.
- Actor snap status.
Actor Control >>
Home Top