The Actor Control Panel
 |
|
 |
|
 |
|
 |
|
 |
|
 |
Welcome How Game Editor Works Interface Main Menu Actor Control Events Actions
The
Actor Control Panel
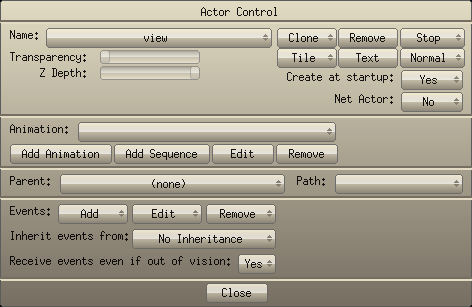
The Actor Control Panel gives you the ability to create uniqueness in your Actor's behavior. The Actor Control Panel is accessed by right mouse clicking on an Actor and selecting Actor Control from the pop up Actor Menu:

The Actor Control Panel is where your Actor can be directed to display text or Animations, to follow a certain path, and/or to react in a specific way when it is assigned an Event or Action. The Actor Control Panel is a powerful feature. If you want to build successful games, it is critical that you become familiar with all of its options .
The
Actor Control Panel provides you with a myriad of useful features.
The following discussion deals with what each feature has to offer and
how it is used.
Name:
This drop down box displays the name that you have given to your Actor.
Click in this box pops up a list that displays all of the Actors in your
game. You can select any Actor and modify or edit its behavior using the
Name box.
Transparency:
Transparency sets the visibility of your Actor. An Actor that has 50%
transparency will show some of the background that is behind itself. An
Actor with the Transparency set to 0% (default) will appear as solid.
Child Actors inherit the parent's transparency.
Z
Depth:
This option sets the order or depth of an Actor in the game. For Example,
if your game includes a tree (Actor) and a rabbit (Actor), you would set
the tree Actor Zdepth behind the rabbit Actor Zdepth so that the rabbit
would appear to hop in front of the tree.
Create
at startup:
Actors can be created immediately upon game start up or later in the game.
This option specifies whether the Actor will be created when game begins.
If you set this option to No, you can create the actor by using
the Create Actor
action.
Clone:
Create an Actor's clone. Cloned Actors share the same Actions
and Animations.
Single: Select this option to make a single clone of your current actor.
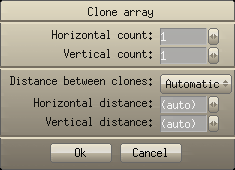
Array: Create a rectangular array of actors. Change the parameters to see the changes in real time.
- Horizontal count: specifies the number of clones in a line.
- Vertical count: specifies the number of clones in a column.
- Distance between clones: select Automatic to get the distance from the actor's width and height.
- Horizontal distance: choose Manual in the list above to specify the horizontal distance between actors.
- Vertical distance: choose Manual in the list above to specify the vertical distance between actors.
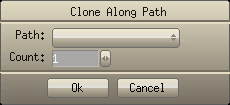
Along path : Create the clones following a selected path. Change the parameters to see the changes in real time.
- Path: select a previously created path from the drop down box.
- Count: specify the number of clones in the selected path.
Remove:
Remove the selected Actor from the game
Move
and Stop:
Specify if the selected Actor will move along a path and show the animations
while in Game Editor mode.
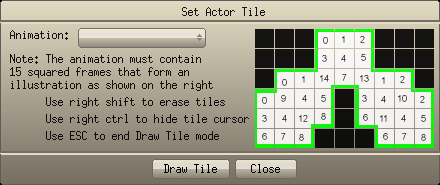
Tile Matching: Create Tile Matching.
Animation: Select the Animation (graphic) file from this drop down box.
The Tile Animation (graphic) must contain 15 squared frames that form an illustration as shown above.
- Use <RIGHT SHIFT> to erase tiles.
- Use <RIGHT CTRL> to hide the tile cursor.
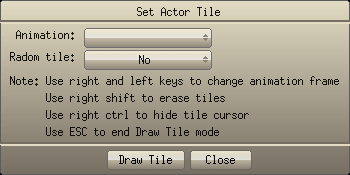
- Use ESC to end the "Draw Tile" mode.Single tile: Create a Single Tile.
Draw a single tile.
Use the <right> and <left> keys to change the animation frame.
Text:
Specify the Actor Text and Font. (Actor Text can't receive collision events)

Text: Type your text here. If you enter nothing, any previous entered Actor text will be removed from your actor.
Font: Select the font that was previously created using the New Font button.
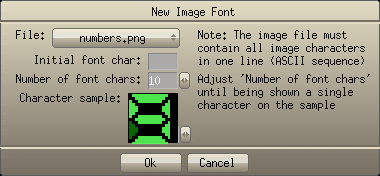
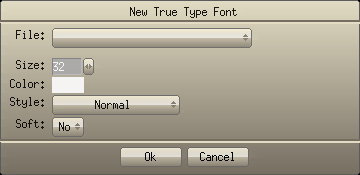
New font: Specify a "From Image File" or a "True Type" Font to attach a font to your text.
File: Load text from a file or save text to a file.Image font: Create a font from an image file.
File: Load an image file (jpeg, gif, png, bmp, pcx, tga, xpm, xcf, lbm and tif). The image file must contain all of the image characters in one line (ASCII sequence).
Initial font char: Set the initial image character in the loaded file.
Numbers of font chars: Set the number of characters in the loaded file.True Type font:
You can load any True Type font (.ttf files) and set the size, color, style (Normal, Bold, Italic and Underline) and soft (Anti Alias).
Text Input:
Select "Yes" to configure a text input Actor to receive text entered by the user.
The text entered by the user can be retrieved in the "text" or "textNumber" actor variables.
You can set the input length by entering some text or just by inserting blank space characters .
If you enter more than one text line, your input will automatically become multi-lined.
The maximum length of the input text is 255 characters .
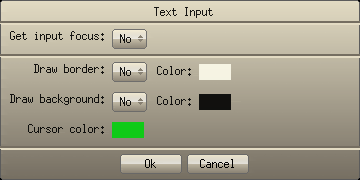
On the Pocket PC only, open the Soft Input Panel in a non rotated resolution.Text Input Configuration:
Get input focus: Select "Yes" to get the input focus for this actor
Draw border: Select "Yes" to draw a border around the text input box using the selected color . Left mouse click the color box to select a color.
Draw background: Select "Yes" to draw a background behind the text input. Left mouse click the color box to select a background color.
Cursor color: Left mouse click the color box to select a cursor color.
Known Text Input bugs: If your text uses a True Type Font and the user enters text that is beyond the input limit, some of the characters may be lost.
Normal or Infinite:
Select x Infinite to repeat the Actor along the x axis.
Select y Infinite to repeat the Actor along the y axis.
Select Infinite to repeat the Actor along both axis.
Select Normal for no Actor repeating.
Animation:
Add,
edit or remove animations and sequences in a Actor.
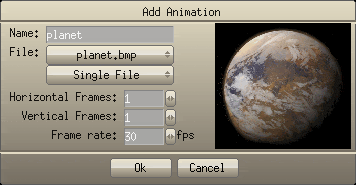
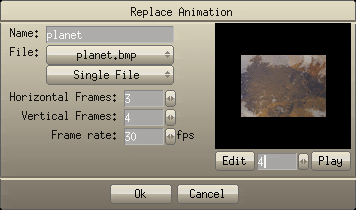
Add Animation: Add a new animation to the selected Actor.
- Specify the animation name.
- Select the animation file (jpeg, gif, png, bmp, pcx, tga, xpm, xcf, lbm and tif).
- Specify if the animation is contained in a single file or multiple files.
- If the animation is contained in a single file, specify the number of horizontal and vertical frames.
- Specify the animation frame rate.
Notes:
- If the image file has a color depth lower than 32 bits, Game Editor understands that the color of the first pixel (upper left corner) is the color that should become totally transparent in the image.
- If your image has 32 bits color depth, Game Editor will consider the alpha channel (transparency channel) of the image.
- If your image is a gif, Game Editor will consider the gif transparent color.
- If all pixels in the image have the same color (solid image) the image will be consider solid.
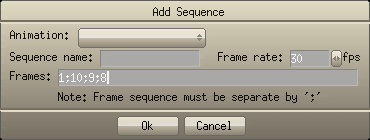
Add Sequence: Define a frame sequence based on the animation.
- Select an animation.
- Specify a sequence name.
- Specify a sequence frame rate.
- Enter the frame sequence (Ex.: 14;2;9;10;22;2;3;4...).Edit: Edit an existing sequence or replace an animation file.
- Enter a new Frame Sequence.
- Specify a new sequence Frame Rate.
Use the Edit button to open the image editor.
The image editor defined in the Preferences panel will be open with the selected animation frame.
After save the frame in the image editor, the frame will be updated in Game Editor.Notes:
- The image editor need to handle transparent PNG image files.
- Before edit, the game must be saved.
Parent:
Set the Actor's Parent (the Parent can be any Actor
in the game, including the " view" Actor, or "no parent").
When
an Actor has a parent, when the parent is moved the child actor will be
moved too.
Path:
Set the Actor's path
(the path can be a created path, a "random path", or
"no path").
Events:
Events happen when something occurs on an actor. For example, a user
mouse clicks on an Actor or an Actor collides with another Actor.
Events and Actions work
together to breathe life into your Actors.
Actions occur as a follow up to an Event. For example, after a user mouse
clicks on an Actor(Event), the Actor animation changes(Action) or after
one Actor collides with Another Actor(Event), the Actor colliding is destroyed(Action)
Envision a space ship being hit by or colliding with a bullet.
It is critical that you understand Events and Actions in order to get
the most out of Game Editor.
Click
here to read more detailed
information on Actor Events.
Click here to read more
detailed information on Actor Actions.
You can use the option "Inherit events from" to make the current actor inherit events from selected actor.
The current actor will have all your events plus the events from select actor.
Example:
Receive events even if they occur out of vision:
You have some different 'enemies' actors that move to left and right directions and can jump.
You can create a 'baseEnemie' actor and add the events to move:
Right key: to move to right
Left key: to move to left
Up key: to jump
After select the 'enemies' actors and select "Inherit events from: baseEnemie".
If you want make some enemy jump in a different form, just add a new Key Down event with the Up key.
When the user press the Up key, the executed event will be the event defined in the enemy actor.
Set this option to "No" to optimize your game. Actors out of vision with this option set to "No" don't receive the following events:
Animation Finish
Collision
Collision Finish
Draw Actor
Key Down
Key Up
Mouse Button Down
Mouse Button Up
Timer
Events >>
Home Top
