Hello world!
Today I've decided to stop all progress on P2040, I felt I've spent/wasted enough time on it as it is and besides, it's in demo-release conditions!
-Introduction-
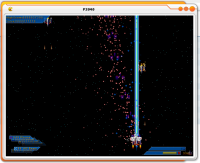
P2040 is a bit revolutionary, it takes the arcade feel and shoves it into GE with pretty graphics. There's not much to say about game play other than it's cool weapon system of 6 different weapons! Arm yourself with you daily normal shots, Fat Balls, Ice Pellets and the plasma shot! Don't forget those special weapons in times of need! The Plasma Bomb (P-Bomb) will send your enemies within it's explosion radius into mercy and the all-mighty WY-Beam that induces constant damage to wipe out several ships at once!
-Story-
There is none, use your imagination!
-Features-
-Neat graphics and sounds!
-Particle limiter for slower computers!
-Double weapon system that totals 6 different weapons!
-Joystick support!
-Comes with a Level Editor!
-Much more!
-Screen Shots-
-The Keys-
Left, Right, Up, Down/Joystick Axis 1 - Move your ship around
Space/ Button 0 - Shoot primary
Left Ctrl/ Button 1 - Shoot secondary
Z/ Button 3 - Change Primary
X/ Button 2 - Change Secondary
-Additional Information-
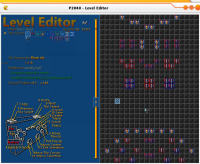
P2040's Level Editor is one of my jewel in programming; It's a first for me, and perhaps for GE. It uses an external Bitmap file to then draw manually pixel per pixel the tiles in the editor, and just the way it does it, well, I guess it's unique?
Even though I find it's awesome and easy to use; it's hard to get used to
So here are how to get around in the Level Editor:
The best thing to know firstly about this editor is it has two "window". In other words, there is a menu selection and there is the editor itself where you modify your level. And in order to change something in each, you have to switch between them. This is the main principle of the Editor so that's why I felt I should let you know now before I start explaining the rest.
Defaultly you'll find yourself in the Menu Selection under the Joystick Control. If you don't have a joystick, I need you to press Enter on your keyboard to activate the Keyboard Control. The little joystick icon change to a keyboard, and the big square thing on the bottom left changed into a keyboard! read this, I know it's a bit hard but it tells you the keys for the current "window" you're in (Either the Menu Selection or the Tile Selection)
Now I can just hear a lot of people going "huh... how do I.. switch menu selections.. I can only change tiles!" Press the Select button (F, Joystick button 0), hurray!
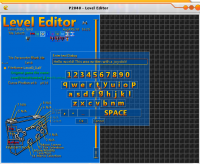
To change a string of text, either press left or right (A and D or Left or Right on the first axis of joystick) and you'll be brought to the Text Editor window
If you're using a joystick, you'll notice the first axis now reacts like a mouse! meaning the position of the joystick is the position of the mouse (the cursor being a little white glowy dot for easy pointing), just hover over a letter and press the button 0, Button 1 is the shift key and Button 2 erases a letter. Note: the .alf button simply add ".alf" at the end of the string. handy for the file name
Now if your joystick's first axis is not a joystick but four buttons (Oh no!) or that you just don't have a joystick, use your mouse :) Left click to select a letter, Right click to erase the last one and both of the Shift key to shift! Note: The joystick mode goes on automatically after the mouse stops moving for a while
To change the Tile Parameter, just press left or right (A and D or Left and right on first axis for joystick)
Same with Current Tile, except with both axis (W,A,S,D and the first axis of joystick)
Now that you know how to get around the Menu Selection, it's time to learn the real fun part; Tile Selection mode!
You should know from now that to change screen, you need to press the button to goes to it (C/B10: Menu Selection V/B11: Tile Selection)
In the Tile Selection, simply go up, down, left and right to move your cursor around (W,A,S,D or first axis on joystick), to move the view around (Up, Down, Left, Right arrow keys and Second Axis for joystick).
Press and hold the Select Button (F, Button 0) and move your cursor around to select multiple tiles at once. Press the Put Tile to paste a tile (G, Button 1) works with multiple tiles at once! Press the Move Tile button (H, Button 3) to move tiles around, make sure to keep it pressed so you don't put it somewhere you shouldn't and erase what's underneath, works with multiple tiles at once! To quickly put a blank tile, press the Delete button (T or Button 4) works with multiple tiles!
To save files (Z, Button 8) and to load them (X, Button 9).
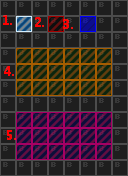
1. Normal Cursor
2. Delete Cursor
3. Put Cursor
4. Select Cursor
5. Move Cursor
With that said, I'll let you discover the rest. I hope you enjoyed this...
--
Special thanks goes to Fuzzy and Bee-ant on helping me clean the code where it was possible, thanks a lot :)
-Some little Back-Info-
I was suppose to finish this game with 20 levels, have it finished like a real game and everything, but I ceased because I felt I was wasting my time with this, I already have the basic layed out, the rest would just be minor additional coding and a lot of graphic doing that would match the quality of the rest. I hope no one's deceived about my decision. But if you want to play bunch of levels, the level editor's right there so help yourself :P
-The File-
http://dl.dropbox.com/u/9246426/p2040.zip
should contain the Data folder, the P2040.ged, the Level Editor.ged, the Level0_0.alf and the LevelObject.bmp
And please, I'll even beg you, tell me what you think, and if you like this, I want to know it!
I beg you!
P2040;An almost clomplete game;for the use of this comunity
Forum rules
Always post the games with a screenshot.
The file must have the ged and data files (complete game source)
Use the forum attachment to post the files.
It is always better to use the first post to put the game files
Always post the games with a screenshot.
The file must have the ged and data files (complete game source)
Use the forum attachment to post the files.
It is always better to use the first post to put the game files
15 posts
• Page 1 of 1
P2040;An almost clomplete game;for the use of this comunity
Last edited by Game A Gogo on Fri Aug 13, 2010 2:52 pm, edited 1 time in total.
Programming games is an art,
- Respect it.
-

Game A Gogo - Posts: 3466
- Joined: Wed Jun 29, 2005 10:49 pm
- Location: French Canada *laughs*
- Score: 181

Re: P2040;An almost clomplete game;for the use of this comu
This game is fantastic! I really like shooters, and especially your particle effect is addictive.
Andreas
Andreas
Co-Developer of GE engine
If u are interrested in new features of apple or android ge engines check the engine support website game-editor.net regulary.
If u are interrested in new features of apple or android ge engines check the engine support website game-editor.net regulary.
Re: P2040;An almost clomplete game;for the use of this comu
Thank you! I'm glad appreciated my game, you can expect more of that in the future, I wanted to make one I've always been trying to do for years!
P2040 was kinda a warm up when I started it. At least the new project will have a cleaner code and better level file integration, because that wasn't planned at first in p2040, it made out for little dynamic.
P2040 was kinda a warm up when I started it. At least the new project will have a cleaner code and better level file integration, because that wasn't planned at first in p2040, it made out for little dynamic.
Programming games is an art,
- Respect it.
-

Game A Gogo - Posts: 3466
- Joined: Wed Jun 29, 2005 10:49 pm
- Location: French Canada *laughs*
- Score: 181

Re: P2040;An almost clomplete game;for the use of this comu
Solid work and love of programming pays off. I tip my hat off to you game a gogo.
Tutorial Database for all beginners click this link
viewtopic.php?f=4&t=8680
viewtopic.php?f=4&t=8680
Re: P2040;An almost clomplete game;for the use of this comu
thank you!
Programming games is an art,
- Respect it.
-

Game A Gogo - Posts: 3466
- Joined: Wed Jun 29, 2005 10:49 pm
- Location: French Canada *laughs*
- Score: 181

Re: P2040;An almost clomplete game;for the use of this comu
OMG i wanna play this so bad but I'm using my wii to check up on the forums my computer is broken >.> It should be up this week or the next 
Subscribe to my YouTube? - Yes| No
Re: P2040;An almost clomplete game;for the use of this comu
Love the slow down effect on Pause 

Winter Blast 1: http://www.dreade.org/games/WinterBlast.zip
Winter Blast 2: download/file.php?id=4282
Collection: viewtopic.php?f=4&t=8252
-

Bee-Ant - Posts: 3723
- Joined: Wed Apr 11, 2007 12:05 pm
- Location: http://www.instagram.com/bee_ant
- Score: 210

Re: P2040;An almost clomplete game;for the use of this comu
hehe thanks everyone 
Programming games is an art,
- Respect it.
-

Game A Gogo - Posts: 3466
- Joined: Wed Jun 29, 2005 10:49 pm
- Location: French Canada *laughs*
- Score: 181

Re: P2040;An almost clomplete game;for the use of this comu
Ok computer is fixed testing now 
Subscribe to my YouTube? - Yes| No
Re: P2040;An almost clomplete game;for the use of this comu
OH MA GAWD!
ITS AWESOME !
!
ITS AWESOME
Subscribe to my YouTube? - Yes| No
Re: P2040;An almost clomplete game;for the use of this comu
This is AMZING i love the explosions and everything, they all work perfectly. and i also like the bit at the end, with your name in power-ups. if u made a few more levels, u could sell this one for quite a bit on the online market.
--> For my help, i ask for a simple +1 if it helps! ^-^
--> I dont code, I type art which you dont understand.
--> I keep winning the 3D model challenge at college, teacher says: "you keep winning im not giving you prizes".
--> I dont code, I type art which you dont understand.
--> I keep winning the 3D model challenge at college, teacher says: "you keep winning im not giving you prizes".
Re: P2040;An almost clomplete game;for the use of this comu
IF I had 400$ which I don't.
Programming games is an art,
- Respect it.
-

Game A Gogo - Posts: 3466
- Joined: Wed Jun 29, 2005 10:49 pm
- Location: French Canada *laughs*
- Score: 181

Re: P2040;An almost clomplete game;for the use of this comu
--> For my help, i ask for a simple +1 if it helps! ^-^
--> I dont code, I type art which you dont understand.
--> I keep winning the 3D model challenge at college, teacher says: "you keep winning im not giving you prizes".
--> I dont code, I type art which you dont understand.
--> I keep winning the 3D model challenge at college, teacher says: "you keep winning im not giving you prizes".
Re: P2040;An almost clomplete game;for the use of this comu
So I only stick with GE for making games out of fun; programming is in my blood and I can't live without it >_>
Whenever I'll be useless here, I'll be gone no warning, people will forget me until a bit later "Where's that gogo guy?"
I have no benefit in using GE whatsoever at this point, but I hope this community and perhaps Makslane profits a little from my efforts. High quality demo's are gonna get GE more popular than most demo's out there... Not to be mean or anything, some people who makes demo's quickly without quality in their mindset sometimes shows a bad example of GE; But what can they do more? they've been though by other bad examples. GE is a place where it doesn't harvest only good programmers, no, far from that. It brings inexperienced users and trains them. So I like to consider GE as the door for greater things. It made scripting easy to learn; for me at least.
Programming games is an art,
- Respect it.
-

Game A Gogo - Posts: 3466
- Joined: Wed Jun 29, 2005 10:49 pm
- Location: French Canada *laughs*
- Score: 181

Re: P2040;An almost clomplete game;for the use of this comu
updated the main post... it was messy for some reason, nothing interesting.
Programming games is an art,
- Respect it.
-

Game A Gogo - Posts: 3466
- Joined: Wed Jun 29, 2005 10:49 pm
- Location: French Canada *laughs*
- Score: 181

15 posts
• Page 1 of 1
Who is online
Users browsing this forum: No registered users and 1 guest


