Canvas To Window creation is a mdoerate programming level, but if you read this you have nothing to worry about. You can create your own window styles, and you can use ANY image, as long as the image is 96x96, or since your learning how to make it, you can make your own image sizes.
What can CTW do
CTW can make anythimg from Windows, to option selections, to menu's, to basicly ANYTHING that uses a window in standard games
My text isn't right with the canvas
This is because, unlike the canvas's erase method, the window peices get placed 16 pixels to the left and 16 pixels above the canvas, so if you want the text to be aligned perfectly, you'd make the text's x and y exactly equivelent to the canvas x and y. If you are using any image different then 32 x 32, then it will place the tiles half of its size instead of 16. For example, if your images are 48 x 48, which makes every tile 16 x 16, then it would be aligned 8 pixles instead of 16.
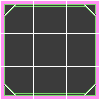
The Image structure
The images all must be like this at first, untill you can learn how to design your own programming methods.
But, there must be 3 tiles x, and 3 tiels y, heres an example.
Make the animations
Make your window character, as his image, use the window you designed, or use one of these
The horizontal frames and the vertical frames must be 3.
Now click on Add Sequence, then add each frame 1 by 1, name them topleft, topmiddle, topright, middleleft, middlemiddle, middleright, bottomleft, bottommiddle, bottomright.
Using the window tiles
In order to use the window tiles, make a canvas and use this code.
Make your variables
Make these variables, make sure there actor variables.
- i
i2
i3
i4
- Code: Select all
CreateActor("window", "topleft", "(none)", "(none)", 0, 0, false);
CreateActor("window", "topright", "(none)", "(none)", width-32, 0, false);
CreateActor("window", "bottomleft", "(none)", "(none)", 0, height-32, false);
CreateActor("window", "bottomright", "(none)", "(none)", width-32, height-32, false);
This will create the 4 corners, try it out if you like. If your image size isn't 96 x 96, then replace the 32's with the tile size of your image.
Now for the advanced part.
This part is a little bit advanced and can be confusing, but I'll try to explain it.
Creating the top and botom peices
- Code: Select all
for(i = 32; i<width-32; i+=32)
{
    CreateActor("window", "topcenter", "(none)", "(none)", i, 0, false);
    CreateActor("window", "bottomcenter", "(none)", "(none)", i, height-32, false);
}
The for statement is a loop as far as I know, the i=32 starts the i as 32 so that it dosnt get created where the corners are, the i<width-32 is to make sure that it constantly will create the actor unless it reaches the right corner peice, the i+=32 adds the i, or the tile's position, by 32, so taht it dosnt create zillions of tiles that will create lag, it only creates a tile after it created the last one. Our window should now look like this.
Creating the left and right peices
- Code: Select all
for(i2 = 32; i2<height-32; i2+=32)
{
    CreateActor("window", "middleleft", "(none)", "(none)", 0, i2, false);
    CreateActor("window", "middleright", "(none)", "(none)", width-32, i2, false);
}
Just like the first one, i2 = 32, it sets the first tile 32 pixels so that it dosnt collide with the corner tile. This time yous ee height, instead of width. This is because your creating the left and right side of the tiles, instead of the top and the bottom. Our window should now look like this.
Filling the rest of it.
- Code: Select all
for (i3 = 32; i3<width-32; i3+=32)
{
    for (i4 = 32; i4<height-32; i4+= 32)
{
    CreateActor("window", "middlemiddle", "(none)", "(none)", i3, i4, false);
}
}
The first one, i3 = 32; i3<width-32; i3+=32, sets the first x position, then creates the tiles along the x position. The second one, i4 = 32; i4<height-32; i4+=32 means that it will create a tile for every y position. Our window should now look like this.
Now that you made your CTW window designing
You can post your windows here too if you want.


