
From Game Editor
Making games with Game Editor
In this chapter we will create a game using Game Editor. In order to get the most out of this chapter you should know how to create new game editor projects, create actors, add animations, and run game editor games. These tasks are described in chapter one should you need a refresher.
I have found even with game editor that it is useful to sketch out a basic idea of what I want the game to do. This is just a basic idea and it is written with the intent that as I play the game, I will add or remove features. The final game may in fact be dramatically different from its first description. Note: This first example is based on the excellent tutorial moon defender written by Makslane.
The basic premise of this game is; you the player control a vehicle that is equipped with a cannon and a force shield. The vehicle travels across the surface of a planet in this case the moon. Some foreign agency (the computer!) is attacking you with heat-guided missiles. The vehicle must escape from laser barriers that repel it while destroying the missiles. The top of the screen will be considered to be the upward direction.
From the above description it is clear that we will need one or more actors to represent the land or surface of the planet. Another actor to represent the player’s vehicle; at least one to represent missiles, something for laser barriers and most likely more that will become clear as we create the game.
The player will need some way to interact with the vehicle as well. In the PC world an input scheme has evolved over the year that is pretty standard. AWD and S move the camera or player, Space bar jumps, 1-9,0 are for quick picks, / is for chat and so on. On the smart device though these same options do not necessary apply. This is due in part to the large variety of smart devices available.
Game editor simplifies this task for us because it will allow keys to be re-mapped. This in fact saves a lot of programming time. So our task is more to focus on what makes sense for our game than what the device key mapping for this device or that device are.
In this example we will use the following keys:
Right ctrl, will shoot a player fire ball upward toward the top of the screen
Space bar will cause the player’s vehicle to jump upward. The right and left arrow keys will move the vehicle right and left. The mouse will control the aim of the cannon.
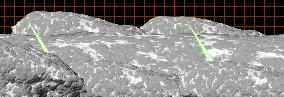
Out first task will be to create the environment that the player can move around in. I sometimes will draw a quick sketch of what I think the game environment will look like. Nothing fancy just enough to get started with. In this case I am envisioning a desolate rocky landscape with rocky hills valleys and so on. The shy is probably a star filled blackness. The terrain continues on indefinitely.
Maybe something like the picture shown below:
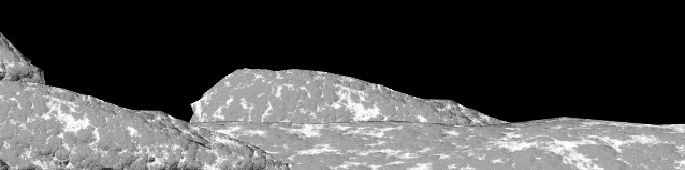
We can tell several important items from the above descriptions. We will need rocks, a rocky terrain, maybe some sand. We can create a seemingly infinite terrain with just the images shown below:
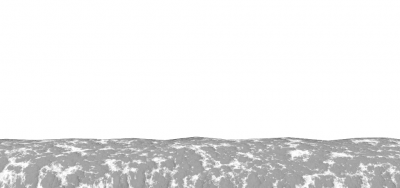
Land
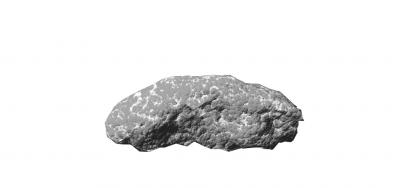
Rock1

Rock2
Create a new project, name the project moon defender. The first task is to create an actor to represent the land. Create an actor with the following properties:
Land Actor
Name: Land
Animation: land.png
File: single file
Horizontal Frames: 1
Vertical Frames: 1
Create at startup: Yes
Move the land actor to the bottom of the view. The land actor is pretty large however we want it to be infinite. In actor control click on the normal button and select the option that says x Infinite. This will extend the land across the bottom of the view indefinitely.
Ok we have land but its kind of sparse and to tell the truth not very interesting. We can fix this by adding some rocks that will sit on the land. So add two more actors, rock1 and rock2 as shown below:
Rock1 Actor
Name: Rock1
Animation: rock1.png
File: single file
Horizontal Frames: 1
Vertical Frames: 1
Create at startup: Yes
Rock2 Actor
Name: Rock2
Animation: rock2.png
File: single file
Horizontal Frames: 1
Vertical Frames: 1
Create at startup: Yes
In order to provide the illusion of an infinite play surface we will need more rocks than just these two. There are a couple of ways we can do this. We could create more actors, but a better way is to clone these two rocks. A clone is a duplicate of an actor including it’s animations, events and actions. This is very useful as it means you only need to create the behind the scenes stuff one time.
Right click on the rock1 actor, select Actor Control and click the clone button. You will be presented with a list of options:

All we need at this point is a few more rocks and we want to place them at different places on the Land so the single choice is perfect for our needs. If you are curious about the other options you can look ahead to see Chapter 3.
If you look at the picture below some of the rocks appear behind the land and some appear in front. This effect is created by changing the Z depth of the actor. You can think of Z depth as a way of telling Game Editor When to draw the actor. Actors with smaller Z values are drawn before items with larger Z values. This capability allows you to construct scenes with some actors behind other actors and some in front.
To change the Z depth of an actor; show the Actor Control dialog and change the zdepth slider. Continue arranging rocks and clones until you have something similar to the picture shown below:
Next we need to create a laser barrier that will ‘push’ the player back if encountered. Create a new actor:
Laser Actor
Name: Laser
Animation: laser.png
File: single file
Horizontal Frames: 1
Vertical Frames: 1
Create at startup: Yes
We will need a couple clones of the laser actor (three total) to provide more of a challenge for the player. Alter the Z depth of the lasers so that they appear between the rocks similar to the picture below:
Now that we have some where for the player to play we need to have something to play with. In this case the lunar rover. Create an actor called car.
Car Actor
Name: Car
Animation: car.png
File: single file
Horizontal Frames: 1
Vertical Frames: 1
Create at startup: Yes
Yea we have a car! But what is a car without it’s own gun? So lets add the gun actor. This time though instead of a single file we are going to select multiple files. Game editor will look in the folder where the first file is and add all files that are numbered in sequence as a single animation.
Gun Actor
Name: Gun
Animation: cargun000.png
File: multiple files
Horizontal Frames: *
Vertical Frames: 0
Frame Rate: 30
Create at startup: Yes
The gun is currently detached from the car. This is not what we want we want the gun to move with the car. In game editor this accomplished by making the gun a ‘child’ of the car ‘parent’ actor. Right click on the gun actor and open the Actor Control dialog. Click on the parent button and in the displayed list set car. This will cause the gun to travel with the car as the car moves.
Next we need to set the position of the gun actor so that it sits on top of the car as shown below:
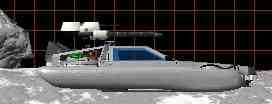
We now have the basics of our game environment setup. If you run the game you will note that the car sits in place, the gun rotates and that is really about all that happens.
Let’s see if we can get the car moving. There are many ways to make the car move. In life a car will accelerate until it reaches the maximum velocity that it is capable of proceeding at. We would like to simulate this behavior with our moon car. To simulate this action we need to increase the velocity of the actor. There are two velocity variables available for every actor, xvelocity and yvelocity. Note: For you reads familiar with C++ xvelocity and yvelocity could be thought of as properties of the actor class.
We also want to limit the max speed of the moon car. To do this we need to apply a limit. There is no built in actor property for this. The reason is that this characteristic is really something that is specific to the game we are creating and not something that may be generally needed. This is not a large problem though because game editor will allow us to ‘add’ variables for our applications use.
Ok enough talk how do we do this? To start off we will need to add a “Key Down” event. Right click on the car actor and select Actor control. Then click Add in the events section. In the list of possible events select the Key Down event. Next press the Right arrow key and add the action Script Editor.
You are now presented with the script editor dialog shown below:

The script editor allows you to type text in the form of C language scripts that are run when the particular event happens; in this case when the right arrow key is pressed.
The scripting language that Game Editor uses is similar to the C programming language. If you are familiar with another programming language then the C language used in game editor will be very familiar. Note: Chapter 7 contains an introduction to the C scripting language used in Game editor.
Enter the following lines into the script editor. To move from one line to the next press the return key.
xvelocity = xvelocity + 1;
if( xvelocity > maxVelocity)
    xvelocity = maxVelocity;
What this script says is: Every time you get a right arrow event add 1 to the cars velocity until it reaches maxVelocity. Game editor however will have no idea what maxVelocity is because we have not defined it yet.
If you look at the bottom of the script editor window you will see button called Variables. Clicking it will bring up the dialog shown below:
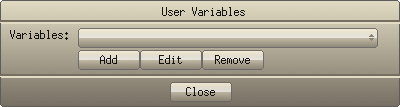
This dialog will allow you to add, remove and edit variables for your game. Clicking the Add button in this dialog will display the Add new Variable dialog shown below:
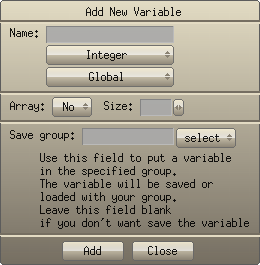
In Name: enter maxVelocity, Set its type of Real, and change the Global flag to Actor, then click the Add button. This will add a variable that is available to all actor’s in our game called maxVelocity. Next click Add, Immediate Action and you should be at the Actor Control dialog.
If you run the program now and press the right arrow the car will not move. This is because maxVelocity is currently 0. 0 is the default value that the game editor engine initializes variables to when it creates them. We need to set maxVelocity to something other than 0. We could do this in many different ways, however it generally is better to set values in the object that uses them. Since the car Actor is the one that uses the maxVelocity variable we should set it when the car actor is created.
Game editor thoughtfully provides an event just for such a purpose, called the Create Actor event. If Actor control if not displayed Display it and make sure that the active actor is the car actor. Then click the Add button in the Event section and select the Create Actor event. Click the Add Action button and select Script Editor. In the script editor enter the following:
maxVelocity = 5.0;
Click Add, click Immediate Action.
Now if you run the game and press the right arrow the car will move to the right and accelerate until it reaches and acceleration of 5.
One thing that you notice is that the car accelerates off the screen and is lost. This is not want we want. We really want the car to stay centered and have the view move around the car. To accomplish this when the car moves we need to move the View actor, (The actor represented by the white square on the stage) by the amount that the car actor moves. Initially it would seem that we could simply use the X position of the car * ½ or /2 and set this when we update the velocity of the actor. The problem with this approach is that at the time we change the velocity the car’s position has not been changed. This problem though is not a huge one. Every ‘frame’ game editor calls the car actor’s Draw Event if one exists. This is the ideal time to update the view actor so that it stays centered around the car actor.
Add a new draw event to the car actor. Set the event’s action to Script editor. In the script editor enter the following:
view.x = x - view.width/2.0;
If you run the game, after you add this change and press the right arrow key you will notice that the car now stays in the middle of the view and the view terrain scrolls
from the right to left.
Now that we have a way to make the car accelerate we need a way to make the moon car de-accelerate. For this we need to add an event so that when the left arrow is pressed the velocity of the car is reduced.
Add another Key Down event to the car actor. This time press the Left Arrow instead of the Right Arrow, and add the action “Script Editor”. In the script editor enter the following:
xvelocity = xvelocity - 1;
if ( xvelocity < -maxVelocity )
    xvelocity = -maxVelocity;
Like before click Add and Immediate Action.
This script needs a little explanation the trick that makes it work is the – in front of the variable maxVelocity. This works like pressing the +/- key on a calculator it changes the sign of the number. So the maxVelocity becomes -5 instead of 5.
Applying a – velocity to the car actor will cause it to move slower and eventually move in the opposite direction if the velocity drops below 0.
If you run the game now you can move the car right and left and the car will accelerate and decelerate as you press and hold the right and left arrows!
In real life a car does not continue at its current speed if you take your foot off the gas. In our game if the player is not pressing an arrow the car should slow down. In order to accomplish this we need to reduce the xvelocity a little bit with each frame that is drawn. Edit the draw actor event for the car actor and add the following to the script action. Add the script line to the end of the current Draw Event script Editor Action.
xvelocity = xvelocity * .95;
So how do we make the car jump? First off we need to add an event the space bar which will start the jump. So like before add a Key Down event to the car actor. This time though set the Repeat field to Disabled. Just like in real life the car needs to have something to jump against. In this case the Land.
Set the action to Script Editor. In the script editor add the following:
if ( y < beginningCarYPosition )
    yvelocity = -15;
Like before we need to add the variable beginningCarYPosition since this is not a provided game editor variable. Make it an actor variable and type of real.
Like before we need to set the value of beginningCarYPosition in the Create Actor Event. Edit the Create Actor event for the car editor and add the following line to the end of the script:
y = beginningCarYPosition;
Add the script and make it an immediate action. If you run the game now and press the space bar the car will in fact jump but it never returns to the ground. This is not exactly what we want. We need to simulate the effect of gravity. Like the problem with xvelocity, gravity’s effects increase over time so we will have to add some gravity calculations into the car’s Draw Event. We also need to make sure the car does not fall below the Land. We can accomplish both effects by adding the following script to the end of the script in the car’s Draw Actor event.
yvelocity = yvelocity + .5;
if ( y > beginningCarYPosition )
    y = beginningCarYPosition;
The car will now Jump and return to the ground when we press the space bar. It will also move right and left. Accelerate and slow down as we press and release the right and left arrows!
You may have noticed though that when the car returns to the ground nothing much happens. It would be much more realistic if when the car returned to the ground after jumping it left some type of trace and the sand on the ground rose up like dust.
We can easily create a couple of actors one to represent the ‘trace’ left by the car and one to represent the dust rising up. There is one more requirement though; we only want these actors to be present after the car has returned to the ground after jumping up.
First create the following two actors and position them outside the view area, set the ‘Create at startup option’ in Actor control to no. We will create these two actors when they are needed.
Trace Actor
Name: Trace
Animation: cartrace.png
File: single file
Horizontal Frames: 1
Vertical Frames: 1
Frame Rate: any value
Create at startup: No
Sand Actor
Name: Sand
Animation: sand000.png
File: Multiple files
Horizontal Frames: *
Vertical Frames: 0
Frame Rate: 30
Create at startup: No
So how do we get these actors to show up when the car hits the ground? Well if you remember we added some code in the Draw Event of the car actor.
if ( y > beginningCarYPosition )
    y = beginningCarYPosition;
This code is run when the car has returned to the ground after jumping. What we need to do is add a couple more lines of script that will create the Sand and Trace actor. Right click on the car actor, open actor control, and edit the Draw Event script action. Note: A short cut approach to editing script actions is to click on the Script menu and select the Car->Draw Actor. Add the following changes in bold type into the car’s Draw Actor script.
view.x = x - view.width/2.0;
xvelocity = xvelocity * .95;

yvelocity = yvelocity + .5;
if ( y > beginningCarYPosition )
{
    y = beginningCarYPosition;
    if(jumping == true)
    {
        jumping=false;
        CreateActor("Sand", "sand", "(none)", "(none)", 0, -30, false);
        CreateActor("Trace", "cartrace", "(none)", "(none)", 0, -10, false);
    }
}
In C script {} are grouping symbols. The say ‘these statements are part of a group of statements’. In this case they say if the variable jumping is true; which means jumping does not contain the value false, then all of these statements in this group should be performed. Note: The if(jumping == true ) statement could be written in the more normal short form of: if(jumping) which means exactly the same think.
What these three statements do is create two actor’s Sand and Trace; the actor’s are created without parents and they are positioned in relation to the ‘event’ actor. Since we are adding these statements in the Draw Event of the
Car actor; the car actor is the ‘event’ actor.
You may be wondering why the jumping variable is used. After all we know that the car has returned to the ground by checking it’s height against the value stored in BeginningCarYPosition. The problem is that the car’s position is also on the ground before it jumps. If we did not track the jumping state of the car then when ever the car is on the ground the sand and trace actors would be created. This is not what we need.
We also need to set the value of the jumping variable. So using the shortcut method edit the Create Actor->script action for the car actor and add the following script line.
jumping=false;
The next item is to set the jumping variable to a value that is ‘not false’. In C script not false is defined as true. Add the following bold script line to the car->Key Down space bar action.
if ( y >= beginningCarYPosition )
{
    yvelocity = -15;
    jumping=true;
}
Note: In the C language false is always defined as the value 0; true however is defined as a value that is ‘not false’ so any value other than 0 is considered true. In Game Editor the values true and false are defined constants so you can use true or false in your games and avoid all of the confusion!
If you run the game now and jump the car when it returns the ground the trace and sand effect is created! However it never stops? Once triggered it keeps going. What we need to do is destroy the Trace and Sand actors once the animations have finished. An animation is considered finished when the last frame in the animation is completed. We can do this by telling Game Editor to destroy the Sand and Trace actor’s once the animation has completed. Open the Actor control dialog if it is not already open and add an “Animation Finish” event to the Trace actor. Make the Action Destroy Actor event actor. Repeat this for the Sand Actor. Note: You do not have to exit Actor Control to add the event to the Sand actor. Simply left click on the button next to the Name: and change it to read Sand. Then repeat the same steps; Add event Animation Finish Destroy Actor event actor.
Now the animation plays one time after the car hits the ground. It would be even cooler if we could play a sound that adds to the realism. In Game Editor this is pretty easy to do. All we need to do to accomplish this effect is to play a sound file, like a wav, voc or iff file when the Sand actor is created. In actor control add the following event and action to the Sand Actor:
Add thump sound when car hits the ground.
Name: Sand
Event: Create Event
Action: Play Sound
File: sand.wav
You may have noticed that the trace and land actor animations don’t mix perfectly. This is because of the transparency settings of the Trace actor. We really should ‘blend’ it with the land actor. We accomplish this by adjusting the Trace actor’s transparency. Open Actor control, make sure the Trace actor is selected and adjust the Transparency Slider about 60% towards the right. This sets the transparency of the Trace actor to about 60% transparent which will blend it with the Land Actor and provide a more realistic effect.
Note: In game editor transparency values range from 0 for ‘not transparent at all’ to 1.0 to fully transparent.
Our car actor is now almost complete, but before we can complete the car actor we need to add some laser bases, missiles and other items.
One the huge benefits of Game Editor is that you can work on a part of the game get it working, like our car; then work on a different part, then go back and work some more on the first part. This is different than a lot of tools and programming systems where you have to ‘do this part’ then ‘do this part’.
So lets leave the car alone for the moment and start working on the rocket bases. The Rocket bases are hidden behind or in the rocks; no self respecting moon base construction engineer would build rocket bases out in the open! This simplifies things for us since we do not need to worry about Animations for the Rocket bases.
Add the following Actor and create a couple of clones, position the Rocket Base actors in the rocks that were positioned earlier.
Rocket Base
Name: RocketBase
We don’t want the rocket base to fire missiles unless the car is within range. After all in real life a soldier would get in real trouble with their commander if the constantly fired the bases rockets!
So first we need to create an actor to represent the fired rocket. Add the following actor to the game we are building:
Rocket
Name: Rocket
Animation: rocket001.png
File: multiple files
Horizontal Frames: *
Vertical Frames: 0
Frame Rate: 30
Create at startup: No
Like the sand actor we want to create this actor while the game is running; and only if the car is within a certain range of the laser base. It would also be pretty boring for the player if the time to first was consistent. We want the player to have the illusion that things are happening at different times. To simulate this ‘randomness’ we will need to use a Timer. A timer event is an event like any other event type. When a set of conditions are met the timer fires the attached action. Before a timer event can in fact occur the timer must be created. So there are multiple steps to timers. If all this sounds a little confusing just follow the steps below and it should become clear.
To our RocketBase actor add a “Create Actor” event. In the Action list choose the “Create Timer” action. Set the actor: to event actor and leave Timer: set at New Timer.
These steps will bring up the Create new timer dialog. This dialog allows us to set various options for the timer we are creating. Set the name of the timer to be rocket and the time to 1000 ms which is 1 second. Click the Add button of the Create New Timer dialog to add the timer we just created. We now that we have a timer that we can use as a “Timer Event” on the RocketBase Actor.
Select the RocketBase actor and bring up Actor Control if actor control is not already showing. Add an event and select Timer. In the Timer Event dialog select the timer we just created. For the timer action select script editor. Add the script statements below to the script editor and add it as an immediate action to the game we are creating.
DestroyTimer("rocket");

CreateTimer("Event Actor", "rocket", rand(4000)+1000);


if(distance(x, y, Car.x, Car.y) < view.width)
{
    CreateActor("Rocket", "rocket000", "(none)", "(none)", 0, 0, false);
}
What do in the above script is a bit involved so I will cover it step by step. We want the rocket to fire at random intervals when the player’s Car is within viewing distance of the laser base. In order to accomplish this we need to:
1.reset the timer to a random internal
2.check the distance the car is from the laser base
3.If the car is within viewing distance to the laser base first a missile.
To reset the timer we need to destroy the current timer and create a new one with exactly the same name. The function call rand(4000) at the end of the CreateTimer() function says to create a new somewhere between 0 and 4000. This is like rolling a 4000 sided dice. Each time we call rand() it will return a new number within the rand we specified. In this case we requested 4000 so the range of numbers it will produce is between 0 and 4000. This number then will tell Game Editor to recreate our rocket timer with an interval of 1000 to 5000 ms or 1 to 5 seconds. (some of these laser base soldiers have very poor reflexes)!
The next statements do what is know in the business as a distance calculation. Game editor has a nice set of built in functions to perform basic geometry type calculations like sin, cos, and distance. If you remember your basic trigonometry we can calculate the distance between any two points by use of the formula:
Fortunately for us we do not need to know all of the workings of what this formula does or how it does it since Game Editor has the build in function distance. What the call to Distance() in the above script says; is if the Car is with viewing distance of the rocket base then create a rocket actor. The next rocket actor will be created the next time the rocket timer fires if the Car actor is still within viewing distance.
So how do we know what viewing distance is? Well if you remember back to chapter 1 we mentioned that the View actor is a special type that is what the player is ‘viewing’ at any one point in time. So because the Car actor is always centered in the View actor; all we need to do is check the distance of the car to the rocket base if the car is not within viewing distance of the rocket base then it must be outside visual rocket base range.
The rocket is created however it does not act like a rocket. In fact it just spins around at the place where it has been created. We will have to add some logic to make the rocket move as we want it to.
In real life again rockets when launched fly upward and then head towards a target in a sort of arc. The rocket should fly towards the car. To get the rocket to “fly” upward we change its yvelocity. This is exactly the same idea as what we did to make the car jump. Right click on the Rocket Actor and in Actor control add a Create Actor event. Set the Action to Script Editor and add the following script line to the script.
yvelocity = -50;
Click add and Immediate Action.
To make the rocket head towards the car we will again have to perform an action over time. This means that we will have to add some C script to the Draw Actor event of the Rocket Actor. Add a Draw Event to the Rocket Actor, Set the event Action to Script Editor and add the following script:
double targetangle;
targetangle = direction(x, y, Car.x, Car.y);

vectoradd(&angle, &directional_velocity, targetangle, 1);
directional_velocity = min(directional_velocity, 10);
animpos = (angle/360.0)*nframes;
What this script does is to first get the angle between the car and the rocket actor. This is accomplished with the direction() function call provided by Game Editor. You may recall that x and y are the event actor’s location which in this case is the Rocket actor, Car.x and Car.y are the location of the car. The direction function calculates this angel for us. The return value from direction is in degrees and ranges from 0 to 360 around the X axis in a counterclockwise manner. Sounds really complex but all those words really mean is that the return value from this function is an angle we can use to ‘aim’ the Rocket actor.
So what is this vectoradd() line? A vector is simply a way of representing a quantity that has a magnitude and direction. Basically it says this quantity is this much headed that way. In the code above it allows us to smoothly change the direction of the rocket so that it does not instantly jump to the new calculated direction. The angle and directional_velocity are variables or properties of the actor, in this case the Rocket actor. If you are beginning to think that Game Editor keeps track of actor’s speed, direction and position using these vectors you’re correct! Fortunately for us we don’t need to know a lot of math to make use of this capability because Game Editor takes care of it for us!
The next script line put a limit on the directional_velocity. This script line says, if the calculated directional_velocity is less than 10 then use that value; however if the calculated value is greater than 10 then use 10. This script line keeps the Rocket from accelerating infinitely.
The last line sets the animation that will represent the rocket. There are 36 frames in the actor action. Each Frame is drawn 10 degrees less than the previous one (counter clockwise). If you remember back to when we were talking about the direction() function, we said that it’s calculated return value was counter clockwise. Since the frames in the animation are drawn counter clock wise the angle that the rocket drawn at aligns with the calculated angle! So all we need to do is translate the current angle of the Rocket actor to the animation frame that represents it the closest.
Whew that was a lot of writing to explain a couple lines script. Believe me it would have been a lot more code if Game Editor did not do so much of the hard work for us.
The ideas behind this aiming code above will work not only for rockets but also for aiming any actor that you want to head towards another actor in a natural fashion.
If you run the game now the Rocket will head towards the car and the animation will be correct for the angle the rocket is facing. When the rocket hits the car it should be destroyed. In order to accomplish this we need to detect when the Rocket collides with the car.
You make have noticed that as long as the car is within range of the one of the laser bases, the base keeps launching rockets. Soon there are a lot of rockets flying towards the car. While this is cute it is not all that useful as a game feature. It would be much more interesting if the rocket exploded and was “gone”.
To make the rocket explode when it hits the car we need to have an explosion actor. Create the following actor:
Explosion
Name: Explosion
Animation: : lightex001.png
File: multiple files
Horizontal Frames: *
Vertical Frames: 0
Frame Rate: 30
Create at startup: No
Once the explosion is finished it should not repeat. We accomplish this like we did with the Sand actor. In Actor Control select explosion and add an “Animation Finish” event. Make the action “Destroy Actor” and leave the actor selection: Event actor. This will destroy the Explosion actor once the last frame in the animation finishes. Make it an immediate action.
The explosion actor is another situational actor. We will create it when needed. In this case we want to create the Explosion actor when the Rocket collides with the car. So right click on the Car, bring up actor control; make sure that the Car actor is selected and add a “Collision” event. The collision event happens when the visible part of one actor occupies the same physical space as another actor. For our purposes a collision on any side is fine so leave the “On:” field to Any Side. The “Of Actor:” field is used to specify the other actor that is part of the collision event; set this field to Rocket since we are managing collisions between the Car and the Rocket. Next Add the action “Create Actor”. Note: We could create the actor in script here by adding a Script Event but since all we want to do is create an Explosion actor, it is easier to simply select this action from the list. Set the Actor to “Explosion”. This will auto fill in the Animation field and we can leave the rest of the fields to their default values. Basically they tell Game Editor to create the Explosion actor in the same place occupied by the Rocket Actor.
We also need to destroy the Rocket when the collision with the car occurs. To do this we need to add a Collision event to the Rocket. Right Click on the Rocket actor and select Actor Control; or bring up Actor control and select the Rocket Actor in the “Name:” field. Add a “Collision” event to the Rocket Actor. Set the Of Actor: field to be Car. Add a “Destroy Actor” action. Set the “Actor:” field to Event actor; the default setting. Since we can have multiple rockets we want to only destroy the Rocket that caused the event. In this case it is important that the destruction happen on the event Actor. Set the action to be Immediate Action.
If you run the game now the Rockets will fly toward the car and be destroyed when the hit it!
Our tutorial is finally starting to look like a game. It is still missing some things and we have a few issues to correct. For example, you may have noticed that the Rockets can hit the land and not be destroyed. This kind of breaks the illusion for the player. Se lets fix that. In Actor control select the Rocket Actor and add another collision event. This time set the “Of Actor:” field to be land instead of car. Once again select the action as “Create Actor” and set the actor to be created as the Explosion Actor. Set the action to be Immediate. Then add another Collision event to the rocket actor to handle its destruction. Set the action to be “Destroy Actor” and once again leave the “Actor:” field to Event actor. You may have noticed that these two steps are exactly the same as the previous sets we used for the car actor with the exception being that we are now doing this for the Land actor instead of the Car actor.
Long about now you programmer type reads are thinking, “You could have done all this with a single script action triggered by the collision event”. Your right we could have; however I wanted to illustrate some of the flexibility that exists in game editor. You can do something in Script, with out using script, or some combination of the two. This is really a very nice feature since it allows you to work on your game in a creative manner instead of constantly thinking “how do I program this”.
We can do one more very simple thing that will make a huge difference in the illusion we are providing for the player. If we set the Z depth of the rocket to be max then it will look like the big rocks are “behind” in the scene and make it appear more realistic. You may be wondering, how did you know that? Believe it or not this occurred to me as I was running and testing this tutorial I decided to set the z dept to max and simply see how it looked; and it worked out well. This was a case of that “nagging something is not right feeling” was reduced. A lot of game programming is like that.
Ok so we have a rocket it can hit things. But other than an explosion we don’t have must to show for it. We really need some way to let the player know that when the rocket hits their car that is “not to be desired”. In this case their shield should be reduced. If the shield falls to zero and the car is hit again it should be destroyed. Well that is unless we choose to implement a “god” mode!
To have a shield reduced we first need to have one. There are many ways we could do this. I am going to show a more complex method that allows something similar to a “life bar” to be created. This is like the red hit point bar you see in a lot of role playing games where the players health or hit points are indicated by how far the bar is towards the right.
To accomplish this we will need a couple more actors. Add the Shield actor HideShield actors described below:
Shield
Name: Shield
Animation: : meter1.png
File: Single File
Horizontal Frames: 1
Vertical Frames: 1
Frame Rate: 30
Create at startup: Yes
HideShield
Name: HideShield
Animation: : meterhide.png
File: Single File
Horizontal Frames: 1
Vertical Frames: 1
Frame Rate: 30
Create at startup: Yes
Set the parent’s of the Shield and HideShield actor’s to be the View actor. This is necessary since as the game view scrolls we want these actors to remain visible. Next position the HideShield actor at the right edge of the Shield actor as shown below:
![]()
How do we change the length of the shield? Well we are going to basically move the position of the HideShield actor so that it covers up more of the shield actor as the shield decreases in strength. In order for the car to “have” a shield we need to add an actor variable to represent the health of the shield. Click on the Script button and select CarCreate Actor. This will bring up the Car actor’s Create Actor script editor action. Click on the Variables button and click the Add button. Type in ShieldStrength in for the variable name, set the type to be “Real” and set it to be an Actor Variable. Click Add and Close but stay in the script editor so that we can set the initial value of this variable when the Car actor is created. Add the following script line.
ShieldStrength=1.0;
Now we need to add the code that will reduce the shield strength and change the shield meter health bar when it changes. We want to perform this action when the rocket collides with the Car. Select the car actor and add a collision event to it. Set the collision event’s “Of Actor:” field to Rocket and add the action “Script Editor”. The bold lines change the amount of health indicated as a percentage and change the position of the HideShield actor so that it covers up the Shield actor as the shield is reduced. The lines in italics are not required to change the Shield Actor. What these lines do is destroy the car and gun actors if the shield is fully gone and the car gets hit by a rocket. How? Well if you recall we are using the HideShield to cover up the shield. So if the HideShield starts at the same horizontal position as the Shield actor then the shield must be fully gone. All we need to do then is destroy the car and gun actors and create the explosion actor to show the player that their car just blew up.
In the Script editor add the following script lines:
ShieldStrength *= .98;
HideShield.x = HideShield.x - HideShield.width *(1.0-ShieldStrength);

if ( HideShield.x <= Shield.x )
{
    DestroyActor("Event Actor");
    DestroyActor("Gun");
    CreateActor("Explosion", "lightex001", "(none)", "(none)", 0, 0, false);
    return;
}
Now we can kill the player off we should give the player some way to “defend” themselves. This means we need to make our gun functional and provide some way to position it. We also need to make it so that it is not constantly rotating around. There are several ways to do this, In this case I want to show a method you can use to detect the position of the mouse in relation to an actor. Why would you care to know this? Well let’s say for example you are creating a Diablo type game. You need to know where the player clicked so that you can move towards that point or fire a spell or arrow or something at that point in the screen. In order to do that you need to know where the player is in relation to this new point. Bring up Actor control and make sure that the Name: field is set to Gun. Add a “Draw Actor” event and add a “Script Editor” action. In the Script editor add the following script lines. Add the action as an immediate action.
double mouseAngle = direction(xscreen - 45, yscreen, xmouse, ymouse);
animpos = (mouseAngle/180.0)*(nframes-1);
if(mouseAngle > 179 && mouseAngle < 270)
    animpos = nframes-2;
Ok you say, “I understand I did something and when I ran the game it worked the gun followed the mouse but how does it work? We the two minute overview is that we used the direction function to pick an animation frame. This is similar to what we did when we made the rockets fire at the car. There is however some difference between what we did for the rocket and what we are doing now.
Game editor provides us with the position of the mouse in xmouse and ymouse variables. This position though is not in relation to an actor, nor is it in relation to a view. Instead it is position to the “actual” application window. The only reason we need to care about this is because mouse positions are provided in screen terms. What this really means is that if we want to calculate a position in relationship to the mouse we need to use an actor’s screen position instead of it’s ‘logical’ position. The x and y variables that we have been using on the actor are used to show it’s logical position not it’s screen position. There are two other actor variables, xscreen and yscreen that Game Editor provides as well. These tell us the screen position.
So to calculate the Angle the gun is pointing in relation to the mouse we can use a script line like:
double mouseAngle = direction(xscreen - 45, yscreen, xmouse, ymouse);
So why the 45? Xscreen and yscreen are in relation to the upper left corner of the actor, this is not what we want. We want the gun to move in relation to it’s center point. That is what the xscreen-45 does. It centers the angle calculation so that the gun will rotate on its center.
Once we have the angle the gun is pointing at we need to determine which frame of the animation we should show. This is accomplished in by using animations frames drawn in a specific sequence and then performing a calculation so that the correct frame shows up. This is accomplished by the line below:
animpos = (mouseAngle/180.0)*(nframes-1);
The animpos variable is an actor variable that tells the actor this is the frame of the animation you should be displaying. What we are doing here is a variation of the percent calculation that we used for calculating the Score. So why did we use 180.0? The reason for this is that this is ½ the total number of degrees in a circle. Since our gun can rotate a total of ½ circle before it is prevented from rotating by the car this works out perfectly. There is one final detail to make this work it is the lines:
if(mouseAngle > 179 && mouseAngle < 270)
    animpos = nframes-2;
These lines prevent the Gun from snapping from left to right or right to left when the mouse is below the level of the car.
Now that we have the Gun tracking with the mouse how to we get it to fire? Well for that we will need to have an actor that will represent what the Gun fires.
Create the actor described below:
Shot
Name: Shot
Animation: : shot1.png
File: Single File
Horizontal Frames: 1
Vertical Frames: 1
Frame Rate: 30
Create at startup: No
We need to dress up the shot actor for starters we should play some kind of sound when it is fired. Add a “Create Actor” event to the Shot actor and as the action select “Play Sound”. This will bring up the Play Sound dialog. For file select the photon.wav and lower the volume to about 30%; move the slider about 70% to the left.
Now add one more “Create Actor” event to the shot actor. This time make the action “Script Editor” and enter the following script. Add the action as an immediate action.
angle = direction(xscreen, yscreen, xmouse, ymouse);

if(angle > 180 && angle < 270)
    angle = 180;
if(angle > 270) angle = 0;
    directional_velocity = 20;
What this script does is set the actor’s angle and directional_velocity so that each frame the position of the actor will change based on these values.
The angle variable allows you to rotate the actor around the view along the x axis. The diagram below illustrates this. Notice that if I wanted the actor to move left I would set its angle to 0. Setting it to 90 would cause it to move upward and so on.
Directional velocity is used by the Game Editor engine to update the actor’s position based on it’s current position and the contents of the angle variable. If directional_velocity is 0 then the actor is not moving.
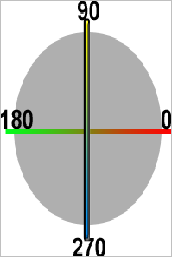
In our case we want to calculate the angle between the screen position of the actor and the current position of the mouse. Then set the actor’s angle variable to this value. Like before the If() statements prevent the Shot from being fired downward since the Gun cannot fire or point in that direction.
There is one more thing we should do, as the code stands when the Shot actor is off the screen it will still continue to move. We don’t want this, when the shot is out of the view we want to delete the Shot actor. We can accomplish this by adding an “Out of Vision” event. Open Actor Control and add the “Out of Vision” event. Add a “Destroy Actor” action and set it to the event actor so that the actor that generates the event will be the actor that is destroyed. See how handy it is to have an actor delete it-self when the appropriate conditions occur! Add the action as an immediate action.
In order to fire the gun we need to provide some way to do that. In this case since the mouse is being used to “position” the gun lets use the left mouse button being released to mean “fire”. Like you might expect this is handled by adding an event. Bring up Actor Control.
Make sure the Gun actor is selected and add a ‘Key Down’ Event. Set the key to be the right ctrl key and set the Action to be ‘Script Editor’. In the script editor add the following line:
CreateActor("Shot", "shot1", "(none)", "(none)", -35, -10, false);
That’s it! Why was it so simple? Well we actually used an advanced programming technique called object oriented programming. When we created the Shot actor we set it up so that it took care of itself. So all we need to do was create one and the Short actor did the rest for us. Pretty nice!
When the shot collides with the Rocket it should destroy the Rocket and update the score for the player. As you probably guessed by now we will use an actor to manage the visual aspects of the Score. Score however should be a numerical value not a pre-drawn picture. In Game editor we would refer to this as a Text Actor. Start by creating the Actor detailed below:
Score
Name: Score
Create at startup: Yes
Parent: View
Now open up Actor Control and look towards the right. There you will see a button labeled Text. This will allow us to create an actor that can display Text instead of pictures. Note: Strictly this is not true a text actor is still displaying pictures it is just that we can get Game-Editor to do the hard work of figuring out how to translate text into pictures for us by using this feature.
Click the Text button in Actor control. This will bring up the Set Text dialog shown below:
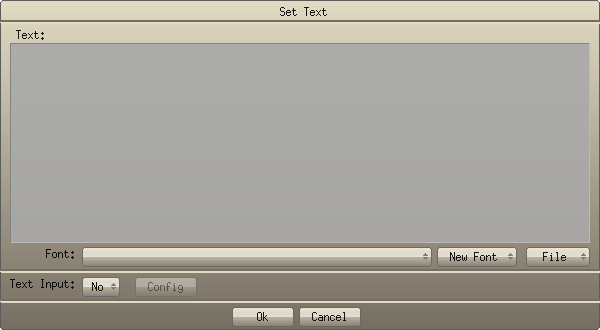
The Text: Field is used to write the text that you want to be drawn for the Actor. The Font: field allows you to select a font you have previously created for this project. The New Font button is used to create one of these Fonts. Text Input is used if the Actor is to allow the player to enter text. The File button allows the text displayed in the Text: box to be loaded and or saved.
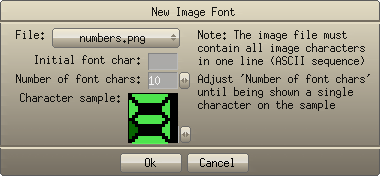
So Click on the New Font button and in the List of Font types select Image Font. This will bring up the dialog shown below:
Click on the button next to File: and select the numbers.png image. This image is shown below:
![]()
Notice how each part of the image is drawn to be the same size? Also notice how the numbers go from 0 to 9 and are arranged in order. If you want to use an Image file for your font you have to set the file up in a specific way. The characters that you display must be arranged in sequential ASCII format. If you look at the chart below:
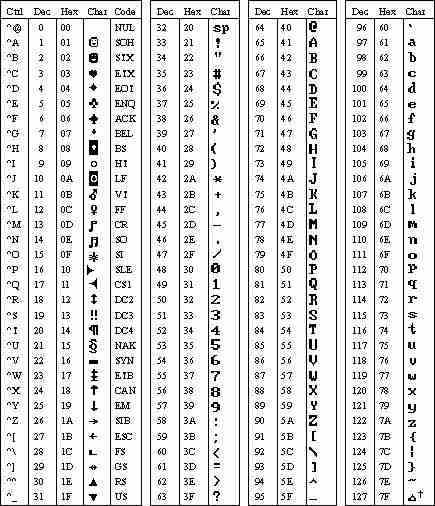
Notice how the characters are arranged in a specific order? This order is important. It is the order that we have to use so that Game Editor knows how to display the characters that make up our font.
If you look at the numbers in the chart above you will notice that they are arranged from 0 to 9 which is the exactly the same order as the images that make up the characters in our font. The only item we have left to do is tell Game Editor how many characters there are in our font and what the first character is. We do this in the New Image Font dialog shown previously.
Set the Initial Font character to 0 and leave the number of characters at 10. Then click ok and game editor will create the font for us.
We now have an actor to represent the Score Position it across from the Shield actor. We now need to update the score when the Shot hits the Rocket. As you have probably surmised we will update the score when the Shot collides with the Rocket. Bring up Actor Control, make sure that the Shot actor is selected and add a “Collision” Event. Setup the Collision Event as shown below:
On: Any Side
Of Actor: Rocket
Repeat: No
Add Action Script Editor
So we now need another actor variable to hold the value of the player’s Score. So add the PlayerScore variable as before by clicking on the Variables button and then clicking the Add button. Setup the variable in the Add New Variable dialog as shown below:
Name: PlayerScore
Integer
Actor Variable
Array: No
Size:
Save Group:
Then click Add followed by Close. In the Script editor add the following lines of script:
PlayerScore = PlayerScore + 5;
Score.textNumber = PlayerScore;
This will cause our Score text actor to update with the value of the PlayerScore.
The car should be knocked backward when it impacts one of the Laser barriers. As you probably guessed this means we need add a collision event. We want the laser barrier to be the controlling actor for the collision event so add the collision event to the laser actor. Once again the action should be a “Script Event” action. Add the script lines below Click Ok, and set the action type of be an Immediate Action.
Car.xvelocity = -30*sign(Car.xvelocity);
PlaySound(“shields.wav”, 1.0, 1);
If you run the game now when the car collides with one of the laser barriers it will be pushed backward and a sound will play. So how does this single line of script do that? Well if you recall the velocity properties or variables of an actor determine how fast it travels in a particular direction. In this case we wanted to ‘push the Car actor backward’. This is accomplished by first determining the direction the car is traveling. Positive xvelocity means that the actor is traveling towards the right, negative xvelocity means it is traveling left. In our game backward movement means to the left so all we need to do is set the car’s xvelocity to a negative value and it will move ‘backward’. How much the car moves backward is determined by the value 30. So what is this sign() function? This function says in effect, “Only use the + or – sign of the variable. So if the car is traveling with a positive velocity (towards the right) sign() would return +1. If the car is traveling towards the left sign() will return -1.
The next script line simply plays a sound file just like we have previously accomplished for the missile collision with the rocket.
There is an issue with the above code. It is very subtle but it would show up if the game is played for a bit. While the Car actor is in fact repelled by the laser barrier the rockets are not. This breaks the illusion for the player that we are trying to create. Game editor has a special built in actor used for collisions. This actor is called the collide actor. If we change the above script line to:
collide.xvelocity = -30*sign(collide.xvelocity);
Then any actor that collides with the laser barrier will be repelled. This is the effect that we want. So click on the menu’s script button, select laser->Collision (Any side of Car) and change the Car actor to collide.
We have one item left. If you remember our brief design we wanted the laser gun to ‘heat up’. This is necessary because we do not want the player to be able to simply hold down the fire key. There was a role playing game several years ago that had a problem of this type in it. Your character could level simply by going to this one place in the game, taping down the left mouse button and attacking the wall. We don’t want this effect to happen in our game.
In order for the player to know, the heat level of the gun we need to provide an indicator just like we did for the ‘Shield” status. So Add the GunMeter actor below:
GunMeter
Name: GunMeter
Animation: meter.png
File: Single File
Horizontal Frames: 1
Vertical Frames: 1
Frame Rate: 30
Parent: View
Like the Shield we need to be able to hide the part of the GunMeter actor. So add the GunHide actor below:
GunHide
Name: GunHide
Animation: meterhide.png
File: Single File
Horizontal Frames: 1
Vertical Frames: 1
Frame Rate: 30
Parent: View
We want GunMeter to work a little differently than the Shield health. We want it to only show how ‘hot’ the gun. As such the meter should be completely hidden initially. To do this position the GunHide actor over the GunMeter actor.
To more easily position the GunHide Actor over the GunMeter actor we can use a game editor feature called Actor Snap. To activate actor snap, press the left shift key. With actor snap on the menu bar will show four little pacman. This means that Actor Snap is turned on. To turn it off simply press the left shift key again. What this will do is cause the actor we are moving around in this case the GunHide actor to ‘snap’ to the nearest actor. This makes positioning one actor over another easier.
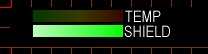
The Shield health indicator movement was from right to left. If you think about it for a bit though you will realize that both actor’s are indicating how much in the same direction or towards the right is increasing and towards the left is decreasing. The difference is that one is indicating how ‘hot’ and one is indicating how ‘much’.
We now have two bars so we need to indicate to the player which one is which. So add the panel actor below:
Panel
Name: Panel
Animation: panel.png
File: Single File
Horizontal Frames: 1
Vertical Frames: 1
Frame Rate: 30
Position the panel actor as shown in the diagram below.
In order to make the GunMeter indicate how ‘hot’ the gun is we need to change our Gun Actor’s KeyDown event that is linked to the right control key. Click on the Script button and select Gun->Key Down (right ctrl, at least one key is pressed). In script editor add the TempMeter variable below:
Name: TempMeter
Real
Global
Array: No
Size:
Save Group:
Then in the script editor change the script
TempMeter += .12;
if(TempMeter < .95)
{
    CreateActor("Shot", "shot1", "(none)", "(none)", -35, -10, false);
}
We need to initialize TempMeter to an initial value in this case 0. So Add a CreateActor Event to the Gun actor and set the Action to be Script Editor. In script editor add the following line:
TempMeter = 0;
The Gun should also cool down to 0 when it is not being fired. A convent place to do this is in the Draw Event for the Gun Actor. Recall that the Draw Event is called every frame. Click on the Script button and select the Gun ->Draw Actor event. Then change the Script adding the lines in Bold below:
double mouseAngle = direction(xscreen-45, yscreen, xmouse, ymouse);
animpos = (mouseAngle/180.0)*(nframes-1);
if(mouseAngle > 179 && mouseAngle < 270)
    animpos = nframes-2;

TempMeter = TempMeter * .98;
GunHide.x = 100 * TempMeter + TempHideInitialX;
Our example game has all of the elements needed for a game at this point. In order to take this example to the next level requires playing the game, making small changes or tweaks, and over time the game would eventually reach a point where it could be published. Often the difference between a ‘best’ seller and an also ran is how much tweaking went into the game. Game Editor with its interactive approach makes this quick simple.
Summary
In this chapter we developed an example game using game editor and discussed many of the features and resources that Game Editor provides. We discussed how these features can be used interactively to create game content in an interactive fashion. In the next chapter we will take a detailed look at Actor’s and just how they form the foundation for game creation.
![[]](../wiki/skins/blender/open.png)