
From Game Editor
The Environment
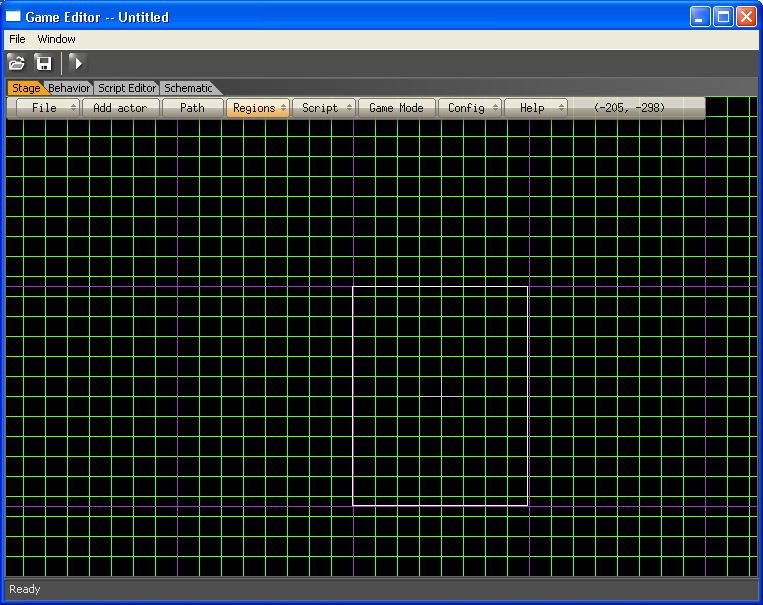
When you first run Game Editor it presents you with a view similar to the one shown in Figure 1. The main window is broken up into several areas. Across the top of the main window are the programs menu, a tool bar and a tab strip. Along the left side are two windows, Actors and Properties. More windows can be Added or Removed allowing a great deal of flexibility in setting up your Game Editor Work space. The main or central area of the tool is a grid with a black background, a lot of little squares and a big white square with a + sign in the middle.
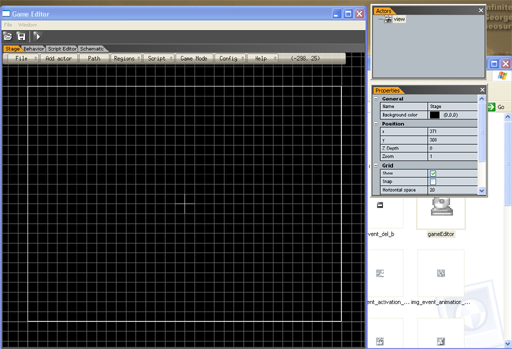
This big grid is called the stage and just like the stage in a play or the board in board game this stage is where you will place and arrange items that make up your game.
The stage positioned with the mouse. If you place the mouse at a location where nothing else is located it will show as a black and white arrow. Left click hold and dragging with the mouse will reposition the stage.
The white rectangle can also be moved. This white rectangle is called the “View actor”. If you move the mouse to the edge of the view it will change to a hand with a finger pointing upward. ![]() If you press and hold the left mouse button and move the mouse the view rectangle will move. Also notice the cross in the center of the screen. This is the logical center of your game. The logical center of your game is 0, 0. If you have worked with math in school you will note that this is similar to the Cartesian coordinate system. X decreases in as you move the mouse to the left and increase as you move it to the right. In a similar manner Y decreases as you move the mouse up and increases as you move the mouse downward.
If you press and hold the left mouse button and move the mouse the view rectangle will move. Also notice the cross in the center of the screen. This is the logical center of your game. The logical center of your game is 0, 0. If you have worked with math in school you will note that this is similar to the Cartesian coordinate system. X decreases in as you move the mouse to the left and increase as you move it to the right. In a similar manner Y decreases as you move the mouse up and increases as you move the mouse downward.
The view actor is special; it represents the area that the player of your game will see when the game is run. By moving this view around you can control what your player sees.
Look at the tool bar you will see a button that looks like this picture ![]() . Clicking on this button will run your game. This is pretty cool game editor has built a complete game for you already! To exit the running game either click the close
. Clicking on this button will run your game. This is pretty cool game editor has built a complete game for you already! To exit the running game either click the close ![]() button or press the Esc key and you will return to game editor.
button or press the Esc key and you will return to game editor.
So just what is this “stage”? If you were going to create a board game you would need a board or a place to put game pieces. These pieces could be a pair of dice, a toy car, and a picture of an axe warrior or anything else your game required. This is what the stage is, it is an area on which you can arrange things.
We now know what the “stage” is but what are things? In game editor “things” are called Actor’s. You have already seen one type of actor the view actor. So what can you do with an actor? Well pretty much anything you want. Actor’s can be warriors, or puzzle pieces, or buttons. They can contain drawings, pictures, animations and so on. Chapter 3 discusses actors in some detail for now lets show you how to create one.
From the application’s menu select the Add Actor option. This will bring up the Add Actor dialog.
This dialog allows you to select the name for your actor its type and gives you the option to Add or Close and not add the Actor to the game you are creating. Type in the name MyActor and click on the Close button. When you do this a smiling Pac man like icon will show up in the center of the stage. The smiling Pac man is a place holder. It shows because we have not added any animations to the Actor. In the Actors window note that your actor is also displayed. If you run your application at this point you will have a smiling Pac man right in the middle of your game.
If you look in the Properties window arranged as a list with two columns. On the left is the name of the property and on the right is its current value. You can left click on the right column and change the property. If you do the change will be immediately reflected on your actor. For example, In the Appearance section is a property called color. Clicking on the color value will activate the field. When the field is active a button with … is displayed at the end of the field. Clicking on this button brings up the standard windows color dialog which allows you to pick or set a color. If you select a color other than white your smiling pac man will change from yellow to a combination of the color you selected and the pac man’s current yellow and white color.
While Pac man is interesting it would be more exciting if we could change the image. Game editor makes it very easy to do this. Make sure that MyActor is selected in the Actors window. Now look in the Properties window below the Color property is an Animation property. On the far left is a little + button. Click it and the Animation section will expand to show several properties. One of these properties is named File. Like Color when you click on the value section of file it will activate and show a … button on the left. Clicking this button will bring up the standard windows file open dialog and allow you to browse to and select a file. If you have installed the example images in the default location, browse to the TDB: Determine where example images will be place and open it. MyActor will change to the image of the file you selected. Running your new game now will display the actor with the image you selected instead of the default one.
Actor’s can form backgrounds, game pieces, missiles any game piece that you need. Actors interact with each other. For example, let’s make a missile actor and have it collide with a target. To do this we will need a target actor, and a missile actor. Note: The steps for this tutorial are listed in Appendix C, Arrow and target.
First create a new project by selecting File – New Game. Now we need a target actor. From the application’s menu select Add Actor. This will bring up the Add actor dialog shown below:
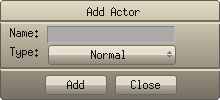
In the Name: field; enter Target as the name of the actor. Click the Add button. The Add Actor dialog will close and you will have a smiling Pac man shown on the stage.
When you do this a smiling Pac man will show in the stage area.
![]()
We now have an actor called Target but it does not look like much of a target at the moment. By default Game editor supplies a Pac man icon to represent you Actor. To make the actor look different we need to supply an animation. An animation is a picture or series of pictures that tell game editor what should be displayed for the actor.
To change the animation right click on Pac man and from the menu displayed:
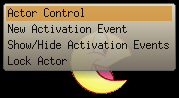
Select Actor Control to display the Actor Control dialog shown below:
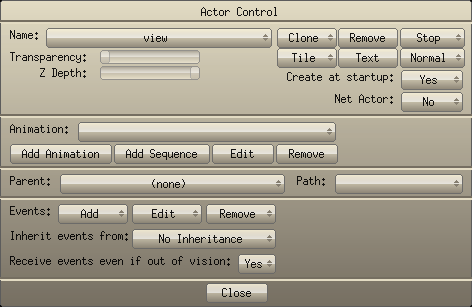
Click on the Add Animation button. This will display the Add animation dialog shown below:
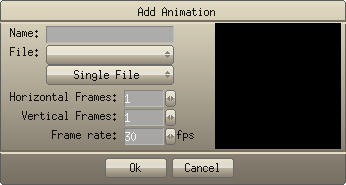
Click on the button next to File: This will bring up the standard windows File Open dialog. Assuming you have installed the samples in the standard location They should be in: My Documents\Game Editor Book Samples\Artwork. Select the target.png image and click the open button.
A red target will be displayed where before there was a black box. This file only has a single frame or image in it so we do not need to change anything else. So click the Ok button.
When you click the Ok button you will be returned to the Actor Control Dialog. Click close on the Actor control dialog. Now your Pac man has been replaced with a picture of a bull’s-eye target.
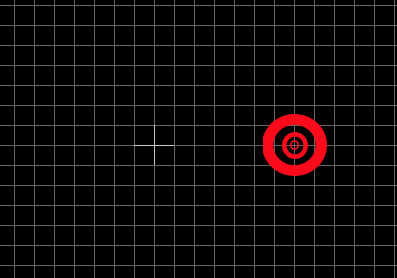
Move the mouse over your target actor and notice that it will change to the hand cursor. Move the target some where on the stage so that it is away from the game’s center point.
Ok now we have a target and we need a missile. Again select Add Actor from the menu. This time name the Actor Missile instead of Target. Once again bring up Actor Control by right clicking on the Pac man and selecting the Actor Control option.
In Actor control click on the Add Animation button, In the Add Animation dialog click on the File button and select missile.png file. Unlike the target animation this animation has two frames or pictures in it. If we display one picture after the other in a timed fashion the actor will appear to animation. In the Add Animation dialog change the Horizontal Frames: field to 2. Notice that the actor starts animating but very quickly. Change the Frame rate from it’s default value of 30 to something like 8 and the animation will look a little better. Click Ok to add the animation to the Missile actor.
Ok we now have a missile but we need it to move towards the target. To accomplish this we will add an event. Like animations, we can add events in the Actor Control dialog. Since the Actor control dialog is still displayed click on the Add button in the events: section. This will display a list of possible events. Choose the Create Actor event. This event type happens one time, when the actor is first created.
The next dialog displayed is the Create Actor event dialog. This dialog allows us to add an action to the Create Actor event we just added. Click on the Add Action button and a list of possible actions will be displayed. Actions can be a variety of things but in our case we want the missile actor to move towards the target and stop with it arrives. So select the Move To action.
This will display the Move To action dialog shown below:
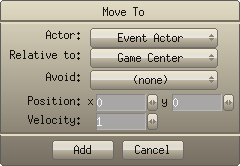
We want to move the missile actor so change the Actor: field by clicking on the button that currently says Event Actor and from the list shown select Missile. Set the Relative to: field to the Target actor. This means in essence move to this place relative to the place in the Relative to: field. Set the Velocity: field to 2. Velocity sets how fast the actor moves.
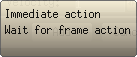
Click Add, from the menu shown select immediate action. This will cause the actor to move to the target immediately instead of waiting.
Click the close button to close the Actor Control dialog. Click Game Mode to run our game. When you are finished click the close button or press Escape to return to game editor.
If you would like to Save this tutorial example, Select File Save from the menu. This will bring up the standard window’s file save dialog. Give the tutorial a name and Click the Save button. Later if you want to work on the game again you can simply by selecting FileLoad.
So far we have learned a little bit about the game editor stage, view, Actors, Events and actions. If you want to skip ahead and see about expanding the tutorial application we have just created check out Appendix’s C and D. These list the events and actions available in game editor. Armed with this information you could easily expand on what we have already accomplished.
You may have noticed that our game ran in a window that seems a little large for a mobile phone or palm type device. This is because by default game editor sets up to work in a 640x480 windows type mode. The Configuration Menu allows us to change many of the game properties and environment of game editor. This next section describes the game properties in detail. I have not provided a tutorial for this section because each of these settings can be tried out to see their effect on the Game Editor environment.
Actors and Property windows
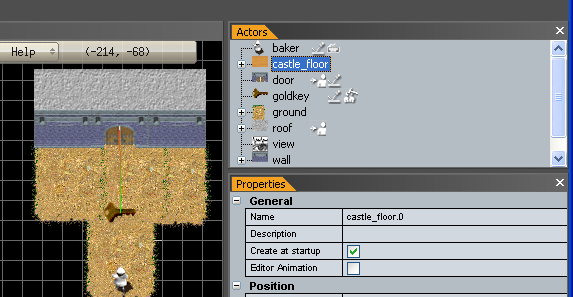
The actors and properties windows are arranged in an editable list format. They work in together and provide an easy means to work with the actor’s that make up your project. These windows are shown below:
The Actors window shows the actors that have been defined in your current game project. Each of these windows can be docked or undocked to the main window. This is accomplished by left clicking on the title bar of the window and “dragging” the window to the edge of the main window. At the point the drag will cause the window to be docked an orange line will appear. Note: The Ctrl key can be held down to prevent docking. In a similar manner dragging a docked Actor or properties window away from the main window will undock it. A docked window travels with the main window and an undocked window does not. The Actor and property windows can be docked side by side or one on top of the other. When docked the actor and property windows can be sized by positioning the mouse to the left or bottom edges of the docked window and dragging with the mouse.
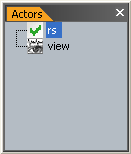
The actor’s window shown below; shows each actor in your game editor project as a single item in a list. A small image represents the actor in the list. In the case of a normal actor with an animation a picture of the first frame in the default animation is shown. After the image the name of the actor is shown. The rest the item is used to show what events are associated with the actor.
If the actor has clones (see chapter 3) then a + - button will be shown on the left edge of the Actor’s window. This button allows you to expand or contract to show the actor’s clones.
If you pause the mouse over an actor in the Actor’s window; this is called hovering, a tool tip help pane will be displayed. This tool tip pane shows the actor’s clone name and its absolute game position. Right clicking on the actor in the Actor window provides a menu that allows the actor to be removed, or have the stage centered on the actor. Note: The selected actor can also be removed by pressing the Del key.
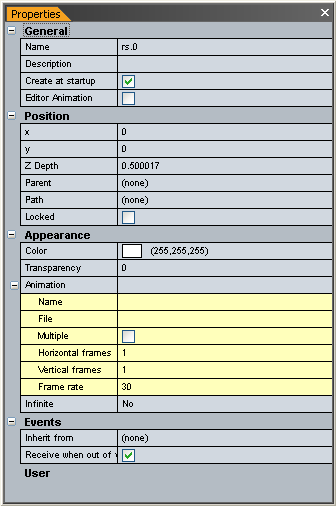
The Properties window is a list is an editable list of the properties that are available for an actor, actions and the stage. The content of this list changes with the actor selected. For example, if you select the View actor the appearance is not available. This is because the Appearance section does not apply to the view actor type.
The + - button on the left side of each section in the Properties window collapses or expands each group of items on the property window.
Behavior panel
TBD
The behavior panel allows you to set events, actions and commands. You use the behavior panel to specify how your actor will work in the game you are creating. (note: Ignore the contents in the Behavior panel. The final behavior panel will have blocks (events, actions, commands...) that you can use to build the actor's behavior (Iconic programming))
Script panel
TBD
The script panel is a full featured script editor that allows you to add and modify C language scripts see chapter 8 for details on Scripting in Game Editor. (Note: - The Script panel don't works )
Schematic
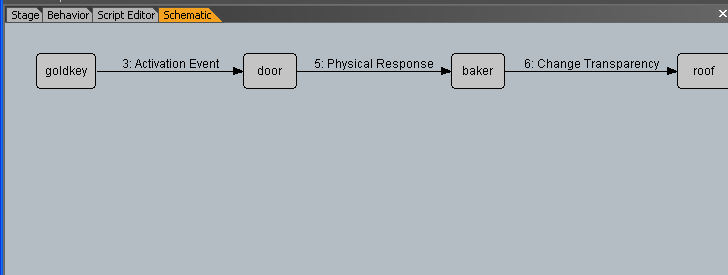
The schematic window provides an execution map of your game. Until your game is run no data will be available in the Schematic window. Once it has the Schematic will provide a map of what events happened and what the response was. This can be very useful for tracking down those pesky “why did this happen and what caused it” type of issues.
Game Properties
After creating a new project the first action I normally take is to set up the game properties. This is accomplished by selecting the Properties menu item from the Configuration menu. The Properties dialog is shown below:
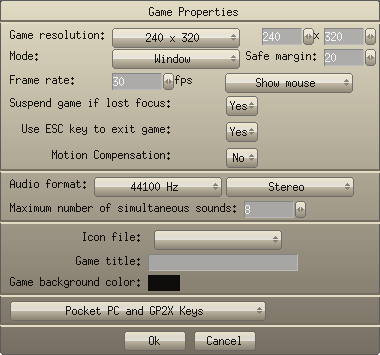
The first setting in this dialog allows you to set the game resolution that the game will run at. It is a button that brings up a list of standard resolutions. The edit boxes next to the Game Resolution can be used to set any resolution even if it is not one of the provided ones.
The next setting is the mode button. Normally I leave this setting at window. Full Screen would be used if your game requires exclusive access. With modern hardware games run windowed mode fine and do not need exclusive or full screen access to windows. Personally I don’t like to play games that can only be run full screen mainly because I have a lot of other windows running at the same time as the game, DVD movie or TV scream, code editor and even an IM client or two.
The frame rate setting sets the maximum frame rate your game will run at. Depending on the type of game you are creating this setting can be anywhere from 1 to 60 or event greater for ‘hard core’ gamers! A frame rate of 13 is usually the minimum setting for frame based animations; below this setting visible animation flickering is visible to the human eye. So why would you not use the highest frame rate? If your game does not require it lowering the frame rate provides more time to process other operations like AI for example. I have through experimentation found that 15 frames per second settings work well for low smart devices. Again this depends on the device you are creating the game for as well as what type of game you are creating.
Suspend game if lost focus tells game editor to stop processing if some other application is being used. This is an important setting and if you are not running in full screen mode then it normally would be set to yes. This is because you don’t want your application using processor time if the user is looking at their email.
Show mouse shows or hides the mouse pointer. For Smart Devices this setting does not have an effect since Smart Devices do not have a mouse.
The next option allows you to use the Esc Key to exit the application. This option come sin handy during development as it provides an easy way to exit your application and return to the game editor development environment. For release though you may want to turn this item off. Additionally on Smart Devices this item has no effect.
The Motion compensation option is specifically for portable devices. This adds logic to the application so that as a person playing your game moves the motion of the device screen is taken into account. Turning this option on though will increase processing time slightly. Again it’s a setting that will be turned on or off depending on the type of game your creating.
Audio format controls the sound format used by your game. This is a device setting. If all of your sounds have the same frequency the game will run slightly faster. This is because the Game Editor engine won’t have to do additional work to ‘match’ up the sound frequencies.
The stereo mono setting specifies the format. Again this can be specific to the device you are making the game for as well as performance. Stereo sounds better but uses more processing cycles.
Maximum number of simultaneous sounds setting is used to specify how many game sounds need to be mixed and played at once. I have found that normally 3 to 4 is more than sufficient the default for game editor is 8. Again more means more memory used and more processing time required but a more immersive environment. One item to be aware of; if you set this value to say 8 and at some point in your game you play 10 sounds; then the first two sounds will be stopped.
The next setting allows you to set the icon that will be used to represent your application. An icon is an *.ico file. This setting applies to Windows Mobile or Windows games only.
The next setting sets your game title. In Windowed mode this title is shown in the caption or title bar for your game’s window.
The next setting is the background color for your application.
The final setting on the preferences dialog is Pocket PC and GP2X keys. What this option really does is allow you to emulate keys that do not exist on your PC. In a way it allows you to set cross key mappings. For example, The GP2X joystick up function is mapped to the up key. What this means is that if you add an action to your game that works with the up key and then create a GP2X version of the game; the GP2X version’s joystick up function will cause the up key code to be passed to your game editor application. This is one of the very powerful functions that Game editor provides that simplifies development across devices. Normally I don’t change any of these settings since they are already mapped for most of the cases I would encounter. The ability though is in fact there.
The game properties option on the Configuration menu brings up the Preferences dialog. This dialog allows you to customize the game editor work space so that it matches your game properties. This dialog is shown below:
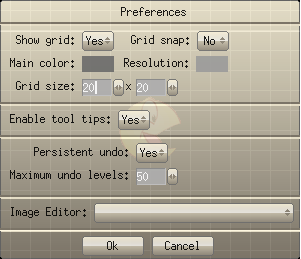
The first setting allows you show or hide the positioning grid. The next option to the right allows you to snap items to a grid boundary. This is a great way to line up items quickly. The main color settings set the color of the grid lines and the Resolution sets the color of screen resolution rectangle. The screen resolution rectangle is the same size as the screen size as set in the Game Resolution item in the game properties dialog. These options are pretty nice since you can set these grid lines up to colors that are not going to be used in your game. Below is an example of changing the stage’s grid to green and the Resolution markers to purple.
The next two options allow the grid size to be set. This is another setting that you will most likely want to change based on the resolution of your game. I always try to make the grid settings an even multiple of the game resolution. What I normally do to figure this out is take the longest resolution and divide it by the number of squares I want. If the result is even I then see of this number of squares will fit in the smaller dimension. Most of the standard video resolutions are multiples of 2. For example, say your game is going to run in 1024x768, resolution on the PC. 32 will work for a grid size since both 1024 and 768 can be divided evenly into each dimension. For Smart Devices I find that the default setting of 20 works well in most cases.
The next setting allows you to specify if tool tips will be available. Until you get use to game editor I would suggest leaving this option enabled since the tool tips contain a lot of useful information. To get a tool top simply pause the mouse over the item or button in game editor and the tool tip will be displayed. Note: Sometimes it is necessary to move the mouse away from the item you want the tool tip for and left click on an empty area of the game editor work space. Then move the mouse back over the item.
The next item allows you to save your undo states between loads and saves. This is a useful ability in cases where you will be working on the same project between sessions.
The max level allows you to specify how many undo steps will be available. For the most part I have found the default setting of 50 to be fine.
The next settings allow you to specify an application to be used as an image editor. Game editor for the most part is a sprite based game development system. As such images are needed. Game editor does not provide image editing facilities instead it leaves these items up to other applications. My personal opinion on this is that that this is a very smart decision. There are many very good image editor’s available from Photo Shop on the very high end, Paint Shop Pro, Paint.net and many different free and shareware utilities. This option requires that you know the location and name of the exe that you want to use to edit images with. For example, if you use photo shop CS2 and have installed it in the default place on your HD then setting this option to:
C:\Program Files\Adobe\Adobe Photoshop CS2\Photoshop.exe
Will allow photo shop to be used as your image editor for any images you use in Game Editor.
Help
The Game Editor Help menu provides a wealth of information including Documentation, tutorials, Game Demos, and a connection to the on line user Forum. The Game Editor’s forum is very active and contains a wealth of issues including answers to some of the most common questions.
Summary
In this chapter we introduced you to the game editor environment. Specifically we talked about the Stage where you create and place elements that make up your game. We also talked about the main elements and windows that are part of the game editor environment. Finally we discussed how to configure the game editor working environment for your own personal taste.
In the next chapter we will game creation using the elements we discussed in this chapter as well as introduce a couple of new elements.
![[]](../wiki/skins/blender/open.png)