lcl's GE lessons - PART 2A (Actor Control panel and Clones)
Hello all!
This is part A of the second part of my series of Game Editor lessons. In this part, we will have a look at the basic things on the Actor Control panel, and also go through the concepts of clones and cloning. Part B of the second part of the series will focus on the rest of the things on the Actor Control panel, including Tile drawing, Text actors and Animations.
I will use the acronym MATL (= More About That Later) to tell you that I have more to say about something, but won't explain it in this lesson, because I consider it out of the bounds of the topic of the current lesson.
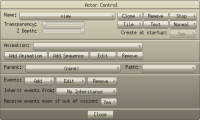
Actor Control panel is the window that is open when ever you open Game Editor. Here's what Actor Control panel looks like.
As said, the panel is open when you start Game Editor, so you don't need to go anywhere to access it. If you close Actor Control for some reason, you can always open it by right clicking any actor and selecting 'Actor Control'.
Now let's go through the basic things on the panel.
The simplest stuff
Cloning and clones
What are clones?
Clones are duplicated actors. The name 'clone' misleads some people into thinking that clones and actors are different objects in Game Editor, but that's not the case. In Game Editor it is possible to have multiple instances of one single actor, and when there is multiple instances of a single actor, you just call them clones instead of actors. So clones and actors are the same thing, clones are identical copies of the cloned actor. Clones are identified by their cloneindexes. The first clone, e.g. the original actor has cloneindex 0, the second one has cloneindex 1, etc.
Why should I use clones?
Clones can be used when there is some element that should have multiple instances of itself in a game. For example things like collectables, enemies, doors, visual effects, etc. can be clones.
For example if your game has collectable coins in it, like in Super Mario, you can just create an actor, give it ananimation of a coin and add an event to it that when it touches you it adds 10 points to the player's score and then destroys itself. Then, now that you have specified the events and animations for the coin, you can just clone it and place the clones into different places in your game worldin Game Editor. You can also add and modify the events of the coin after cloning it, the changes will be made to all the instances of the coin actor, those already created and those to be created later on, they're all clones of each other so they always share the same events and actions.
How should I use clones?
When working with clones you have to remember one thing, and it is that if you're not clone-specific, the events and actions will either affect all clones, or just the clone with cloneindex 0.
A simple example would be the situation where you have an enemy actor called "Enemy" which has multiple clones and you want that actor to be destroyed when it touches a bullet shot by the main character of the game. You would add a collision event to the enemy actor with the bullet actor, and then have a DestroyActor call to destroy the enemy actor. But that's where you have to pay attention, if you set the DestroyActor event to destroy "Enemy", shooting one enemy will destroy all of them. What you want to do is to destroy only the enemy that has touched a bullet, so you would use "Event Actor" instead. Now only the enemy that has touched a bullet will be destroyed and the others will stay unharmed.
Another example of having to remember to be clone-specific, would be destroying the bullet actor, since if there can be multiple bullets on the screen simultaneously, they will also be clones. Now, let's say that your enemy actor has a shield that it lifts up every 5 seconds, and if a bullet hits the enemy when the shield is up, the bullet will be destroyed instead of the enemy actor. Now let's skip the part with checking if the shield is up or not, but let's just go to the enemy's collision event with the bullet and add the DestroyActor command when the bullet has touched the actor. Now here is the same thing again, you can't just tell DestroyActor to destroy the actor called "Bullet", because it would destroy all the bullets, also the one's currently flying in the air not touching any enemy. You should use "Collide Actor" instead, since it will then destroy the actor that has activated that current actor's specific collision event, in this case, that single clone of the bullet actor.
Here's a list of the clone-specific options you can use on most of the commands: "Event Actor", "Parent Actor", "Creator Actor" and "Collide Actor". Note that these are not any other actor types, these are simply clone-specific expressions for referencing the current actor, current actor's parent actor, the actor that has created the current actor by calling CreateActor and the actor with whom the current actor shares the current collision event.
Being clone-specific is also crucial when programming. (Clone specific programming, MATL)
How can I create clones?
Clones are created when you use the 'Clone' option on Actor Control panel, and also when you call CreateActor command to create multiple instances of an actor while in-game.
Creating clones via the Actor Control panel
Clicking the 'Clone' button on the panel opens a list of different choices for cloning. These choices are:
That's all this time, there's no excercises on this lesson. Feel free to try out and experiment with all the things explained, though.
If you wonder why this lesson was split in two pieces, the reason was the length. Even now this first part may be too long for someone. If that's the case for you, let me know, and I'll try to write less next time.
Your opinion about the lesson
This is first time I'm trying to do something like this, and because of that, I may be doing things in a wrong way.
If you feel you have something to say to help me teach better, just bring it up and I'll see what I can do. I want to do this as well as I can and for that I need help from the people I'm teaching.
This is part A of the second part of my series of Game Editor lessons. In this part, we will have a look at the basic things on the Actor Control panel, and also go through the concepts of clones and cloning. Part B of the second part of the series will focus on the rest of the things on the Actor Control panel, including Tile drawing, Text actors and Animations.
I will use the acronym MATL (= More About That Later) to tell you that I have more to say about something, but won't explain it in this lesson, because I consider it out of the bounds of the topic of the current lesson.
Actor Control panel is the window that is open when ever you open Game Editor. Here's what Actor Control panel looks like.
As said, the panel is open when you start Game Editor, so you don't need to go anywhere to access it. If you close Actor Control for some reason, you can always open it by right clicking any actor and selecting 'Actor Control'.
Now let's go through the basic things on the panel.
The simplest stuff
- Name - This shows the currently selected actor's name. You can select an actor by clicking on it, or by clicking the button on the Actor Control panel and then choosing the desired actor from the pop-up list. Actors that have multiple clones have a '+' in front of their name, and by clicking that '+' you can select a certain clone. Selecting an actor will center the editor on that actor.
- Transparency - This slider can be used to set the transparency of the selected actor. Hold mouse over the bar to see the actor's current transparency value. When the slider is at the left end of the bar transparency is 0, meaning that the actor is not transparent at all. When the slider is at the right end of the bar transparency is 1, meaning that the actor is almost completely transparent. Setting transparency to 1 should never be a way of making something invisible, because the actor will still be a little visible. For that, use VisibilityState instead. (MATL)
- Z Depth - This slider can be used to set the z depth of the selected actor. Hold mouse over the bar to see the actor's current z depth value. Z depth means how 'deep' the actor will be in the z axis. 0 means that the actor has the lowest possible z depth value, so all other actors will appear on top of it, covering it. 1 means that the actor is on top of all other actors.
- Remove - Clicking this button will remove the currently selected actor or clone.
- Stop - Opens a pop-up menu with options 'Move' and 'Stop'. When this is set to 'Move' the actor's current animation will play in the editor and the actor will move along its current path. When set to 'Stop' the animation will return to frame 0 and the actor will move back to its original position.
- Normal - Will open a pop-up menu with options 'Infinite', 'x Infinite', 'y Infinite' and 'Normal'. If option 'Infinite' is selected the actor will be shown repeated on the whole game area. If option 'x Infinite' is selected, the actor will be shown infinitely on the x axis, for 'y Infinite' on the y axis. When 'Normal' is selected, actor will be shown normally.
- Create at startup - By default all actors in the editor will be created when the game is opened, but by this option, you can set some to not be created when the game starts. These actors can be later created by using CreateActor command. (MATL)
- Parent - Here you can select a parent for the current actor. When a parent is set for an actor, the actor will inherit the parent's transparency, z depth, r, g and b values. The actor's coordinate system will also change so that the 0,0 point for it's x and y isn't anymore the 0,0 of the game world, but instead the x and y of the parent actor. This being said, the actor will move when the parent moves, so it looks like the actor is attached to it's parent.
- Path - By clicking this button you'll open a pop-up list with the names of all the paths the current project has. By clicking on one of the names, you can give that path to the current actor at the beginning of the game. (Paths, MATL)
- Events (Add, Edit and Remove) - Via these buttons you can add events and actions to the current actor, edit the them and remove them. Basically events mean when something happens, for example when two actor collide, and actions are what should happen when an event occurs, for example the another actor's animation could change upon collision event. (Events and actions, MATL)
- Inherit events from - After clicking a button, a list with the names of all different actors will pop up. From this list you can select an actor which you'd like the current actor to inherit events from. When an actor is selected, the current actor will have all the same events and actions as the selected actor and of course, all it's own events and actions. If there are overlaps with the selected actors events and the current, inheriting actors events, the current actors events will be used instead of the inherited events. For example, if your game has multiple controllable characters, there could be one basic player actor with all the basic events like collision with ground and the movement events. Then you can make all the other controllable characters inherit that actors events, and they will have the same collision events with the ground and the same movement will work for them. And if you want to change something specifically for one of these different player actors, for example the movement, just add new key down events with the desired movement code in there and it will be used instead of the inherited movement code. Note that inheriting animation changes requires the inheriting actor to have animations with same names as the actor it's inheriting from.
- Receive events even if out of vision - Use this option to simply tell the actor if it should keep receiving events and executing actions even when it's outside of the view area. Setting this to 'No' for actors that don't need to function outside of the view can make your games work smoother, as there will be less processing having to be done simultaneously.
Cloning and clones
What are clones?
Clones are duplicated actors. The name 'clone' misleads some people into thinking that clones and actors are different objects in Game Editor, but that's not the case. In Game Editor it is possible to have multiple instances of one single actor, and when there is multiple instances of a single actor, you just call them clones instead of actors. So clones and actors are the same thing, clones are identical copies of the cloned actor. Clones are identified by their cloneindexes. The first clone, e.g. the original actor has cloneindex 0, the second one has cloneindex 1, etc.
Why should I use clones?
Clones can be used when there is some element that should have multiple instances of itself in a game. For example things like collectables, enemies, doors, visual effects, etc. can be clones.
For example if your game has collectable coins in it, like in Super Mario, you can just create an actor, give it ananimation of a coin and add an event to it that when it touches you it adds 10 points to the player's score and then destroys itself. Then, now that you have specified the events and animations for the coin, you can just clone it and place the clones into different places in your game worldin Game Editor. You can also add and modify the events of the coin after cloning it, the changes will be made to all the instances of the coin actor, those already created and those to be created later on, they're all clones of each other so they always share the same events and actions.
How should I use clones?
When working with clones you have to remember one thing, and it is that if you're not clone-specific, the events and actions will either affect all clones, or just the clone with cloneindex 0.
A simple example would be the situation where you have an enemy actor called "Enemy" which has multiple clones and you want that actor to be destroyed when it touches a bullet shot by the main character of the game. You would add a collision event to the enemy actor with the bullet actor, and then have a DestroyActor call to destroy the enemy actor. But that's where you have to pay attention, if you set the DestroyActor event to destroy "Enemy", shooting one enemy will destroy all of them. What you want to do is to destroy only the enemy that has touched a bullet, so you would use "Event Actor" instead. Now only the enemy that has touched a bullet will be destroyed and the others will stay unharmed.
Another example of having to remember to be clone-specific, would be destroying the bullet actor, since if there can be multiple bullets on the screen simultaneously, they will also be clones. Now, let's say that your enemy actor has a shield that it lifts up every 5 seconds, and if a bullet hits the enemy when the shield is up, the bullet will be destroyed instead of the enemy actor. Now let's skip the part with checking if the shield is up or not, but let's just go to the enemy's collision event with the bullet and add the DestroyActor command when the bullet has touched the actor. Now here is the same thing again, you can't just tell DestroyActor to destroy the actor called "Bullet", because it would destroy all the bullets, also the one's currently flying in the air not touching any enemy. You should use "Collide Actor" instead, since it will then destroy the actor that has activated that current actor's specific collision event, in this case, that single clone of the bullet actor.
Here's a list of the clone-specific options you can use on most of the commands: "Event Actor", "Parent Actor", "Creator Actor" and "Collide Actor". Note that these are not any other actor types, these are simply clone-specific expressions for referencing the current actor, current actor's parent actor, the actor that has created the current actor by calling CreateActor and the actor with whom the current actor shares the current collision event.
Being clone-specific is also crucial when programming. (Clone specific programming, MATL)
How can I create clones?
Clones are created when you use the 'Clone' option on Actor Control panel, and also when you call CreateActor command to create multiple instances of an actor while in-game.
Creating clones via the Actor Control panel
Clicking the 'Clone' button on the panel opens a list of different choices for cloning. These choices are:
- Single - Creates one single clone of the actor.
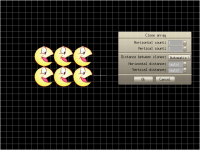
- Array - Opens a window which allows you to clone an array of clones. You can specify how many clones there should be horizontally, how many vertically, and what the distance between them should be. You can experiment with the options to see the results, it's very simple. When the distance between clones is set to 'Automatic', you can't adjust the distance values, but if you set it to 'Manual', you are free to adjust the values. By default the values are set so that the clones will be touching each other by their edges.
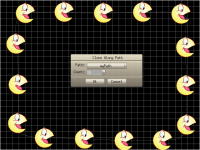
- Along Path - Opens a window which allows you to select a path and how many clones will be created on that path. All clones will be created equal distance away from each other on the path
That's all this time, there's no excercises on this lesson. Feel free to try out and experiment with all the things explained, though.
If you wonder why this lesson was split in two pieces, the reason was the length. Even now this first part may be too long for someone. If that's the case for you, let me know, and I'll try to write less next time.
Your opinion about the lesson
This is first time I'm trying to do something like this, and because of that, I may be doing things in a wrong way.
If you feel you have something to say to help me teach better, just bring it up and I'll see what I can do. I want to do this as well as I can and for that I need help from the people I'm teaching.


